.avif)
How to Make a Spreadsheet? - Step by Step Guide
Do you need to make a spreadsheet but don't know where to start? Here is a step-by-step how to make a spreadsheet guide for you! While online spreadsheets can be frightening and boring at first, with the right user-friendly tools you don't have to struggle with complex interfaces and hard spreadsheet-creating processes.
.avif)
Today, we host data management, project management, expense tracking, personal information and much more in online spreadsheets. That's great, we got rid of paper, pencil, and boring agendas. SSo, do you know how to make a spreadsheet to achieve all this in the most efficient way?
Let's see step by step!
- Create Your First Workspace
- Create Your First Spreadsheet
- Customize Your Spreadsheet
- Enter Your Data
- Create Different Data Views
- Share with Your Team
Create Your First Workspace
The first step to answering the question of how to make a spreadsheet starts with creating a workspace where you can organize your spreadsheets.

- Open app.retable.io
- Log in to your Retable account, or if you didn't create a Retable account go to sign up page and create your free account.
- When logged in to Retable you will be directed to your Retable dashboard.
- Then click the +Add Workspace button at the top left of the page
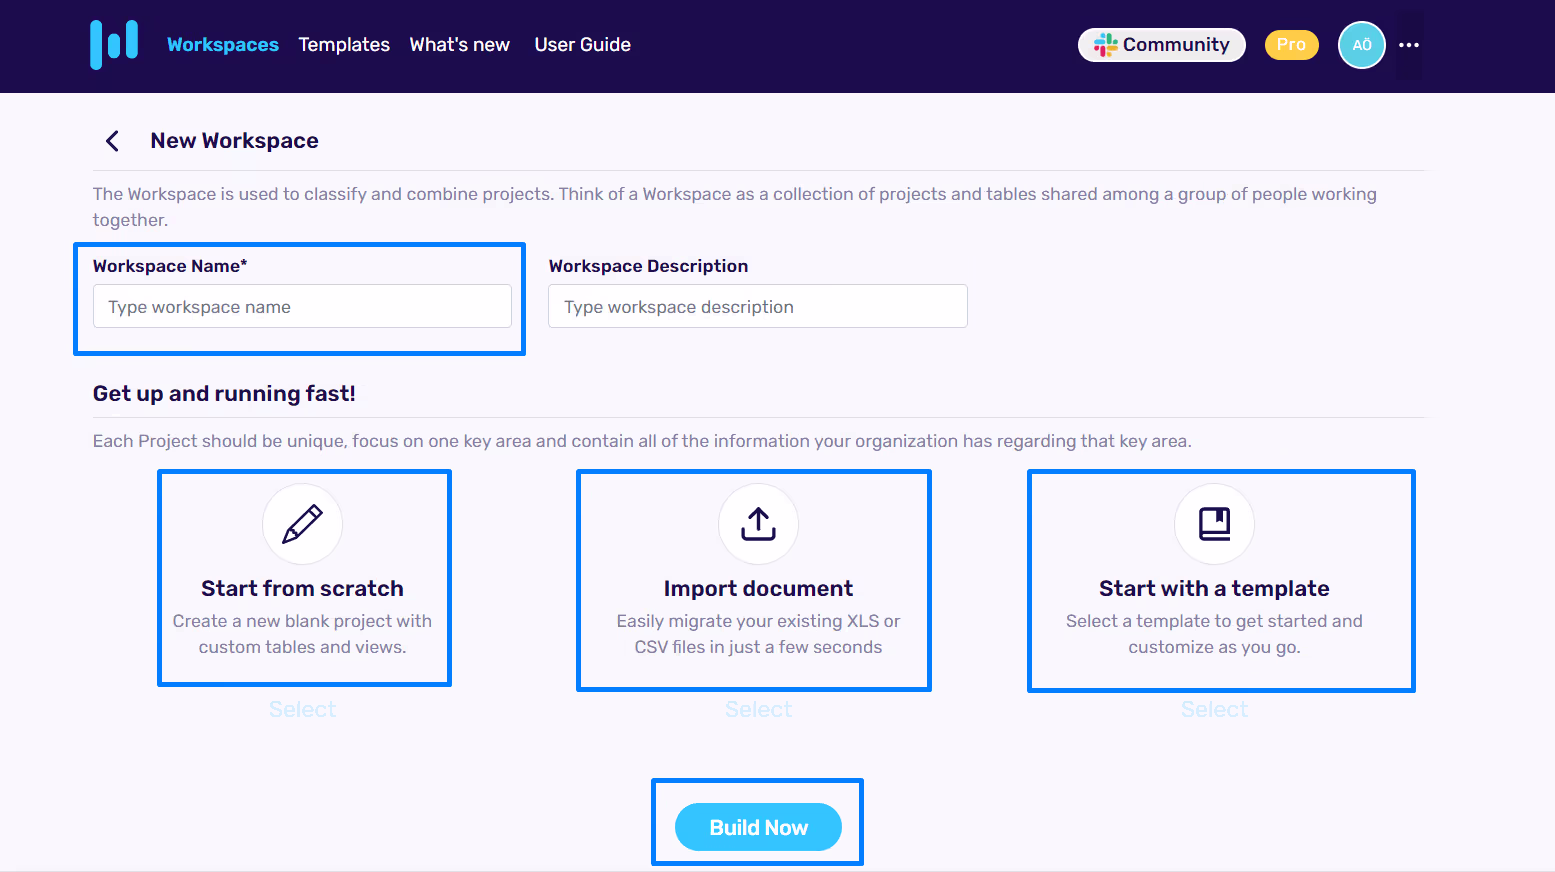
- Write your workspace name and add an optional workspace description
Create Your First Spreadsheet
While creating your first workspace Retable gives you the opportunity to create your first spreadsheet at the same time. After writing your workspace name and description scroll the page. You will see 3 spreadsheet creation options; start from scratch, import document, and start with a template.
Let's go deeper into them one by one.
Start from scratch
If you want to make a spreadsheet on your own from scratch, you can select the "Start from scratch" option. It means that when you select this on Retable creates a blank spreadsheet for you and you can create your own columns and enter your data. Also, you can customize your online spreadsheet as you want.
Import document
If you want to make a spreadsheet by importing existing XLS or CSV files, it's possible in just a few seconds. When you select the import document option, a pop-up window will open and gives you permission to import an XLS or CSV file from your device. It means, Retable directly copies your existing spreadsheet data on your Retable le spreadsheet and you can freely organize your data from Retable as you wish. Your existing columns and data will be directly imported to Retable, and you will be free to edit them.
Start with a template
If you want to make a spreadsheet with the help of Retable's ready-to-use templates, you can select the start with a template option. When you select this option, a pop-up window will open directly, and you will see all ready-to-use Retable templates. You can select one template from the pop-up window to make a spreadsheet with Retable's template. In this case, Retable's ready-to-use template will be copied to your Retable workspace, which means you can freely customize this template and enter your data in this template. So, you can save more time making a spreadsheet.
After selecting one of these options just click the "Build Now" button. Now your spreadsheet is ready! That was the easiest and quickest answer to the question of how to make a spreadsheet.
You can directly see your workspace on your Retable dashboard and under your workspace you will see your automatically created spreadsheet.
Now, it is time to learn the most significant part.
Customize Your Spreadsheet
Customizing a spreadsheet is the most important and enjoyable part of the creating a spreadsheet process. Retable online spreadsheet solution provides you with an environment where you can easily customize your spreadsheet as you wish. If you click on your spreadsheet and go inside of this let's start to customize it.
Name your spreadsheet
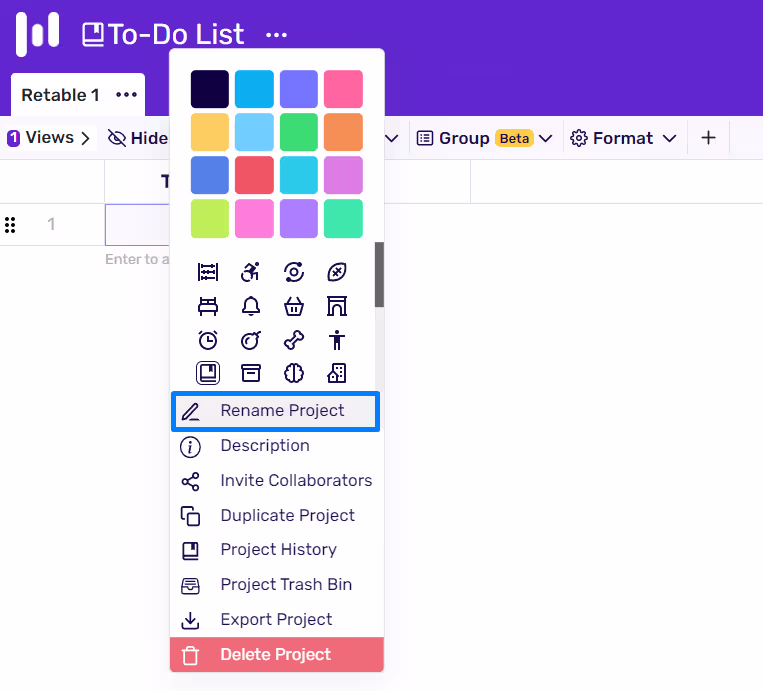
- Click the 3 dots icon near to the spreadsheet name.
- Click “Rename project”
- Type the new name of your spreadsheet and press enter.
Customize the icon and colors
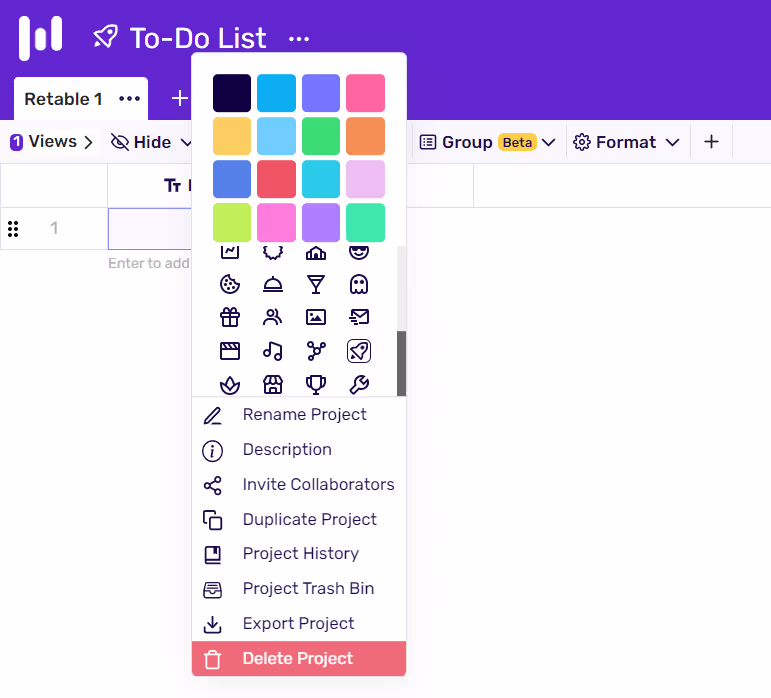
- Click the 3 dots icon near to the spreadsheet name.
- Choose an icon and color to customize your spreadsheet
Create and customize your columns
When you create a spreadsheet, your Retable crates a column and a row for you by default. You can follow the steps below to customize your columns and add more columns.
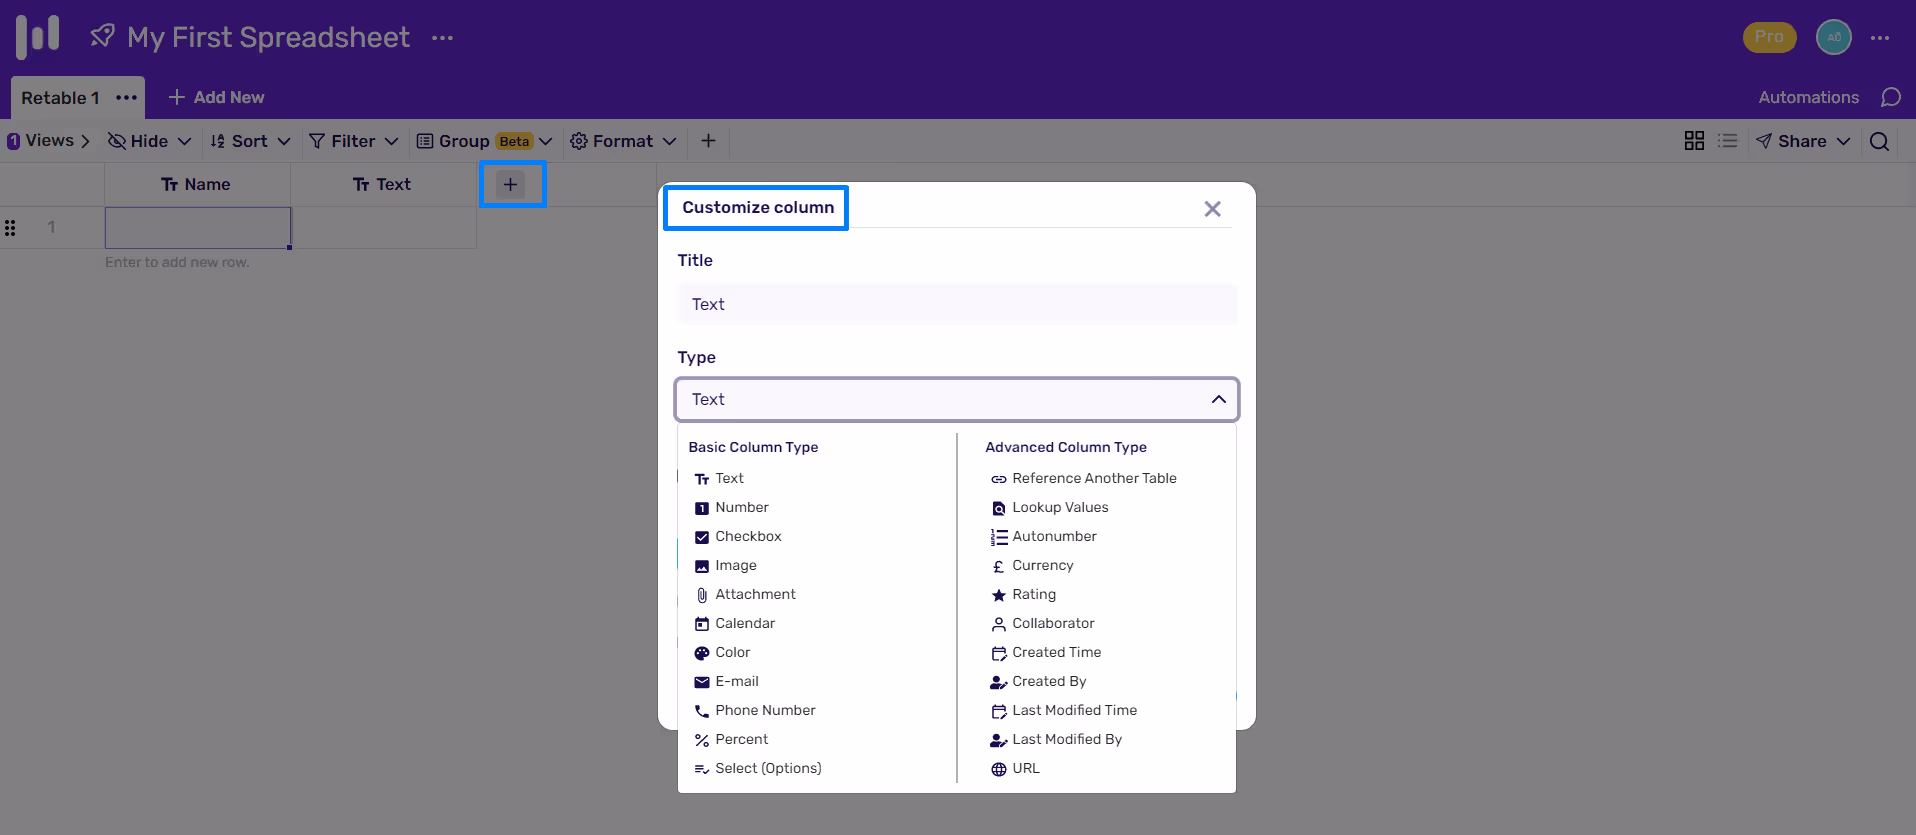
- Click the "+" icon directly near your first column or right-click to your existing column and select "insert a new column before/after"
- Now your column is created, to customize your column right-click to your new column.
- Select "Customize Column"
- Change your column name
- Choose your column type
- Based on your column type, set the other details. For example; you can make your column unique by activating the "unique" box or you can set your column as required by activating the "required" box.
- The other customization options will change based on your column type. For example; if you choose the calendar column type new customization options will be activated. For calendar column type you can set your calendar's date format or activate the include time option. Another example; is if you choose your column type as select you can specify your selection options, order them by drag and drop and change the color of your options. You can also allow multiple selection. If you want to learn more about column customization, choose the column type that you want to organize your data and check the customization options which diverse based on column types.
- When you set all your column customization settings click save. Now your new column is ready. You can repeat this operation to create several columns as you need.
Enter Your Data
Now we are so close to the end of the answer to your question about how to make a spreadsheet. Actually, you already create your spreadsheet at the second step, but we just want to take you deeper into the spreadsheet world. In the first 3 steps, we created our workspace spreadsheet, and we customized our spreadsheet. Now it is time to enter your data into your online spreadsheet.
You have 3 options to enter data to your spreadsheet;
Import a document
If you already have data in XLS or CSV format, you can directly import your data to your Retable spreadsheet.
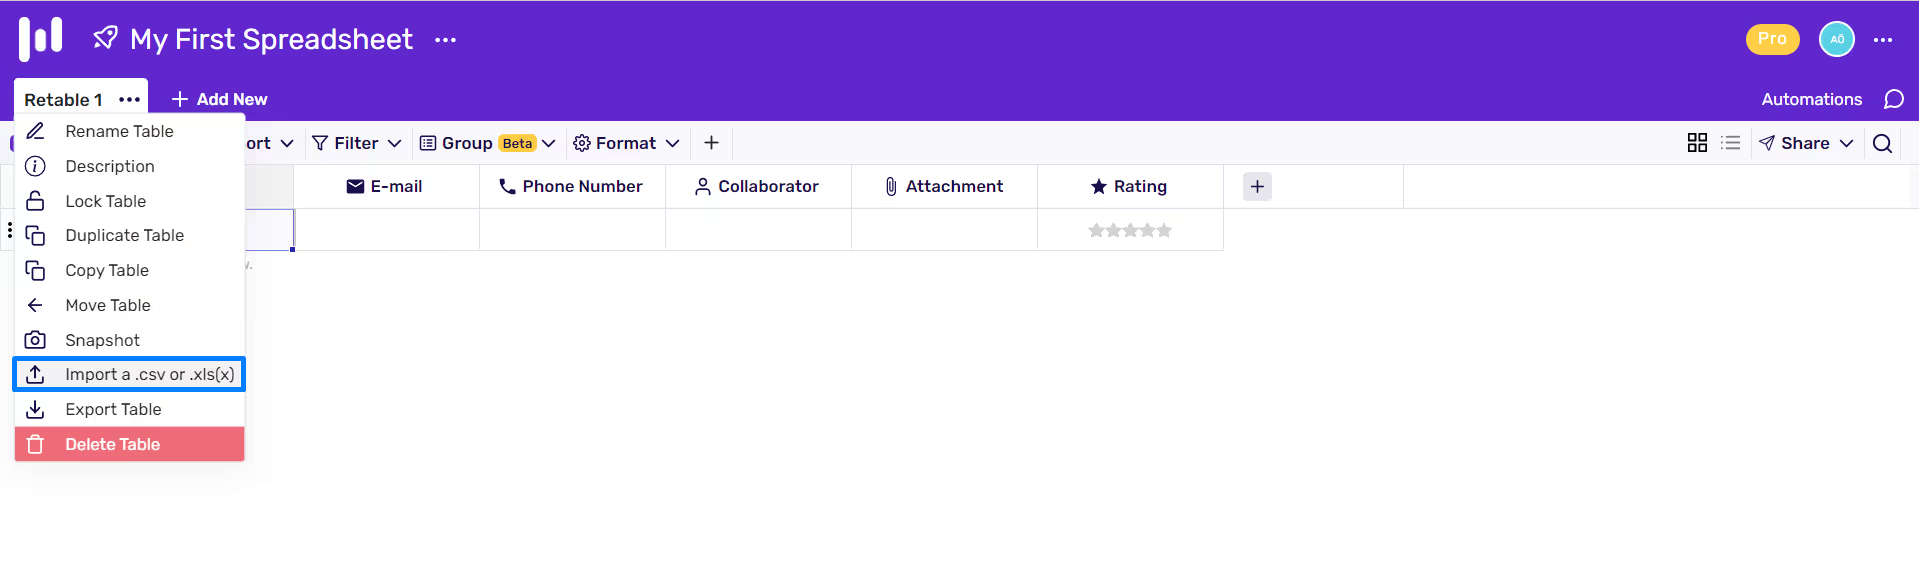
- Click the 3 dots near your spreadsheet tab's name
- Select "import .csv or .xls(x)"
- Select a .csv or .xls(x) File from your device to add new record(s) to your Retable spreadsheet.
Pay Attention: If you activate the "First Row is Header" checkbox a pop-up window will open to give you permission to make your column header and order arrangements.
Enter manually
- Basically, you can enter your data manually on your spreadsheet.
- Just click one cell that you want to enter your data and write.
Copy-paste
- You can directly copy & paste your data to your online spreadsheet
- If you want, you can paste data into each cell separately, or you can paste all the data you copied from a different table into the Retable online spreadsheet at once.
Create Different Data Views
You can follow the steps below to create different data views for your Retable spreadsheet;
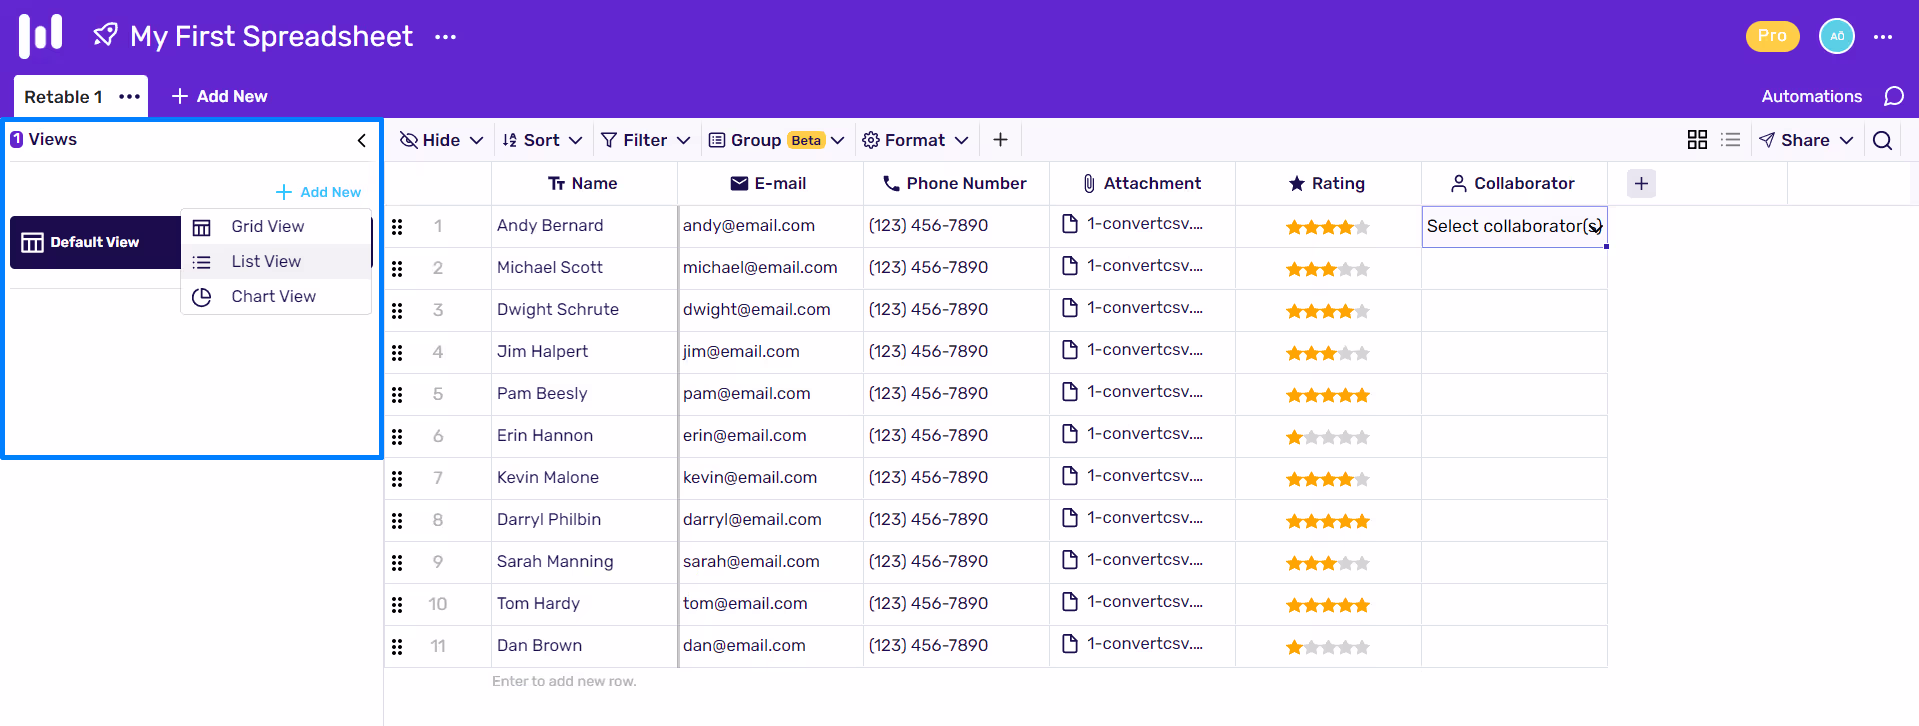
- Click the "Views" area at the top left of your spreadsheet.
- Click the "+Add New" icon.
- Select one view from the drop-down list.
- Now, your new view is created
Different data views help you to see and organize your data the way you want. When you create different data views, your data never changes, only the way you view them. If you wish, you can filter the data view. Filtering, sorting, formatting, or hiding in different data views does not affect your main spreadsheet. Thus, you can easily share your data views as public or private by hiding or filtering the columns you want in your data.
Share with Your Team
You can follow the steps below to share your Retable;
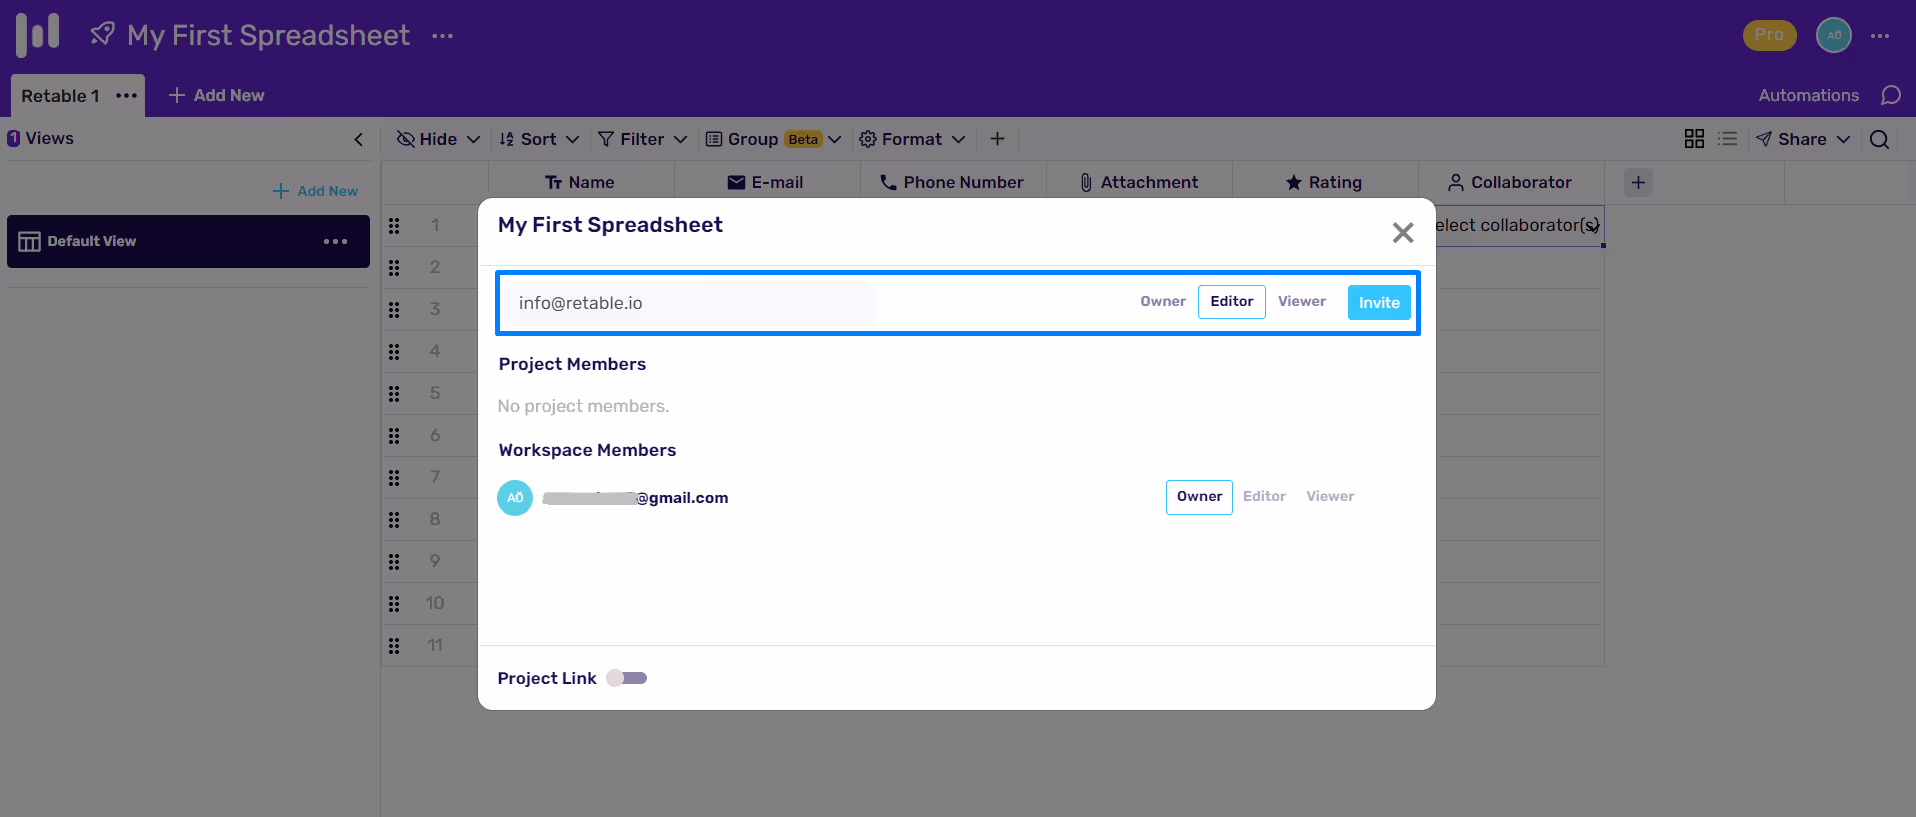
- Click the 3 dots next to Project name at the top of the screen.
- Select "Invite Collaborators" from the menu.
- Type the email address of the person that you want to share your spreadsheet.
- Choose the role as Owner, Editor or Viewer.
- Click the "Invite" button
- All shared users are shown under the "Project Members" section on the pop-up screen.
As another alternative you can create a public share link for your spreadsheets, allowing anyone with the link to view the entire spreadsheet only. You can also share a specific view instead of sharing the entire spreadsheet by doing certain filters or hiding specific columns on your spreadsheets. So, only the authorized people can customize the view's filters, visibility, and field layout/sorts.
You can follow the steps below to share the public view of a spreadsheet;
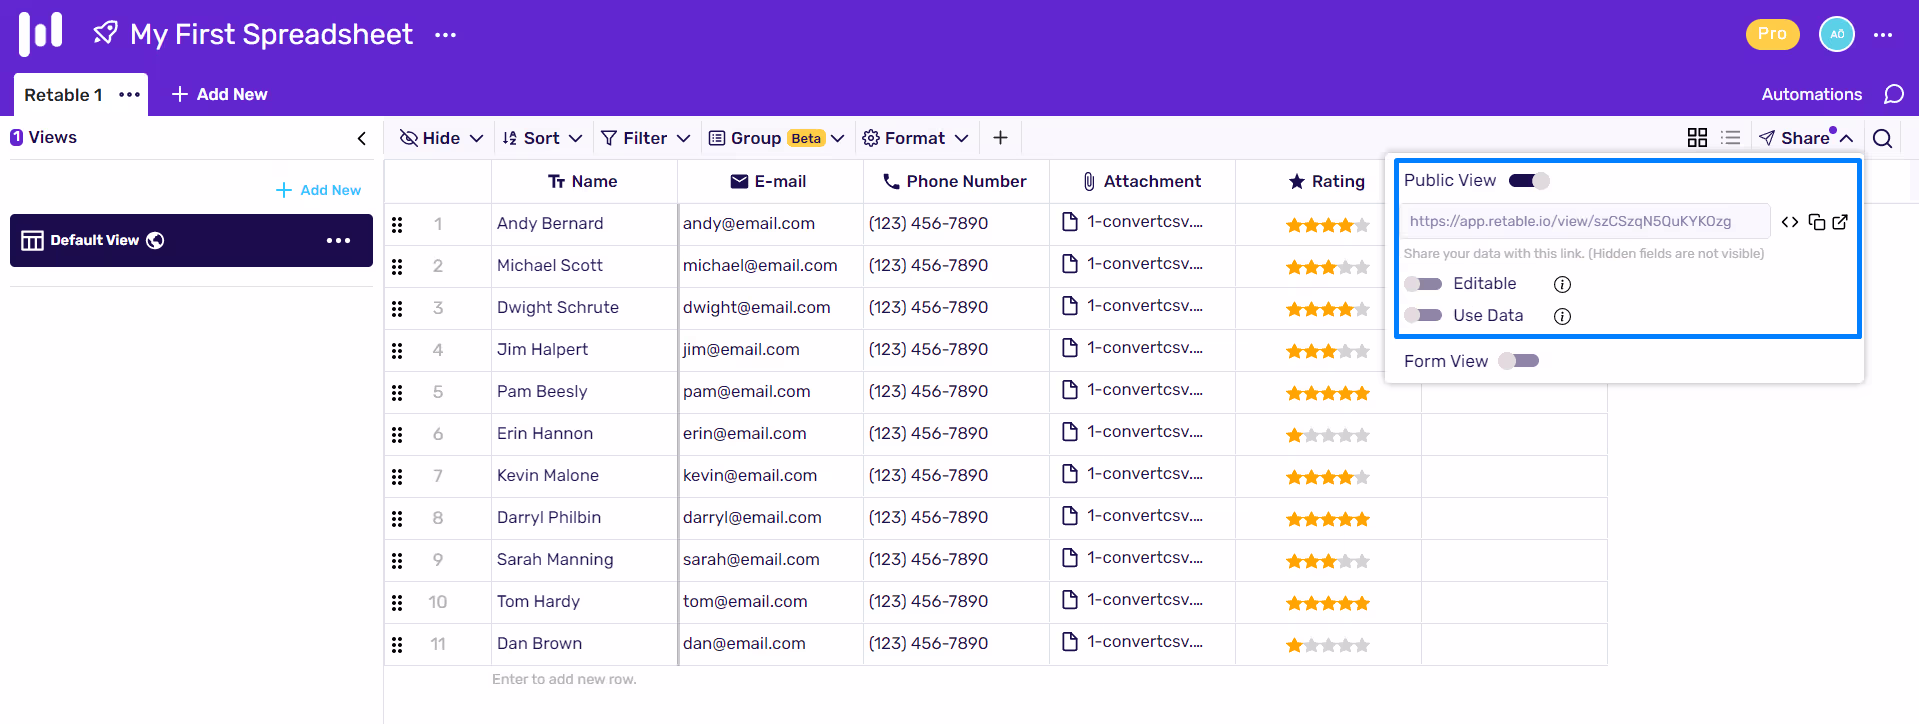
- Click the "Share" button at the top right of your spreadsheet.
- If you want to create a public view for your spreadsheet, activate the "Public View" toggle.
- Copy the link to share your spreadsheet.
- If you want to share this online spreadsheet as editable you can activate the "Editable" toggle.
- The "All" and "Only Data" options appear when the "Editable" toggle is activated. If the user you are sharing with is logged in, the user can operate on the spreadsheet according to the "All" or "Only Data" options you choose.
- If you want to allow the use of data in your spreadsheet, you can activate the "Use Data" toggle. If the users, you are sharing with are logged in to Retable, the users can create a new spreadsheet using this data. Thus, they can copy the same spreadsheet to their own Retable dashboard.
Although it is easy to make a spreadsheet, being able to work and collaborate with them effectively for the long term requires professional and user-friendly tools.
If your first question is "how to make a spreadsheet" the second one should be "how to make a collaborative, user-friendly, and no-code spreadsheet" This article is the answer to the second question which covered the first one.
Online spreadsheets have made our lives much easier, and it looks like they will continue to do so. Now, our expectations from online spreadsheets are increasing day by day. So, what are the features that you consider indispensable in an online spreadsheet? Share with us!
If you are wondering more about online spreadsheets, these topics may also interest you;
- Build collaborative, no-code, user-friendly online spreadsheets powered by your data.
- Why Should You Replace Excel Spreadsheets with Smart Online Spreadsheets?
- 7 Questions You Must Ask Before Starting to Work on a Spreadsheet
- Replace Your Old Spreadsheets with an Online Database
- How to Create Free Online Excel Spreadsheets to Collaborate?
more
Related Resources


Create your smart data management solution
Plan, track, and analyse with your ease. Transform your data with an all-in-one platform, collaborate with your teammates.
Try for free!