.avif)
.avif)
This guide explains how to enter data in a Retable online spreadsheet to generate a set of placemarks in a Retable map view. Retable's cloud-based, collaborative online spreadsheet allows you and your team members to enter data and instantly publish updates in real-time. Using Retable, you can manage your projects, collect data, visualize your data, and map your offices, products, employees, or resources.
You can create 50,000 placemarks per Retable project. When you consider it on an account basis, you can create unlimited placemarks because you can create unlimited Retable projects. With the help of the Retable's map view, you can not only create a map view with placemarks but also, thanks to these interactive placemarks, you can access all the information you want to see about each placemark on your map with a single click. It is also possible to integrate your Retable spreadsheets with different data sources and enable real-time data collection from various data sources. Besides, these data can be shown on your map automatically.
Retable's map view also provides you with location-based density graphs. Thanks to smart coloring, you can see at a glance which locations have more placemarks.
Let's dive into Retable's map view and see how you can create maps that work in sync with your online spreadsheets.
Table of contents
- Getting started with Retable
- Creating interactive maps from a Retable spreadsheet
- What is Retable map view
- How to create a geolocation column
- How to create a Retable map view
- How to add data to your Retable map view with Retable online forms
- How to relocate your placemarks
- How to customize Retable map view
- How to share your Retable map view
- How to embed your Retable map view
Getting started with Retable
There's a lot to explore in Retable, but let's simply put it: Retable is a next-generation online spreadsheet tool that allows you to organize, store, visualize and collaborate on your data in a variety of ways. Retable combines the logic of databases with the ease of use of spreadsheets, allowing you to create small business applications with your data.
If you are new to Retable, you can take your data management to the next level by taking a look at our "Success with Retable in 10 minutes" article!
Many professionals use Retable for everything from marketing management to automatic data synchronization, from customer relationship management to applicant tracking processes. The only limit to what you can do with Retable is your imagination. Now, you can start your challenge with your imagination!
Creating interactive maps from a Retable spreadsheet
- What is Retable map view
- How to create a geolocation column
- How to create a Retable map view
- How to add data to your Retable map view with Retable online forms
- How to relocate your placemarks
- How to customize Retable map view
- How to share your Retable map view
- How to embed your Retable map view
What is Retable map view
Retable's map view is one of Retable's 8 advanced data views. Map view, which shows you the location data in your spreadsheets on the map, has many use cases. While some of our users use map view to track the locations of their customers, some of them can easily track real estate data via map view. If you need a dynamic map that is automatically updated according to your spreadsheet data and you have already experienced the difficulties of integrating Google Maps with your spreadsheets, you can solve this need in seconds with Retable's map view.

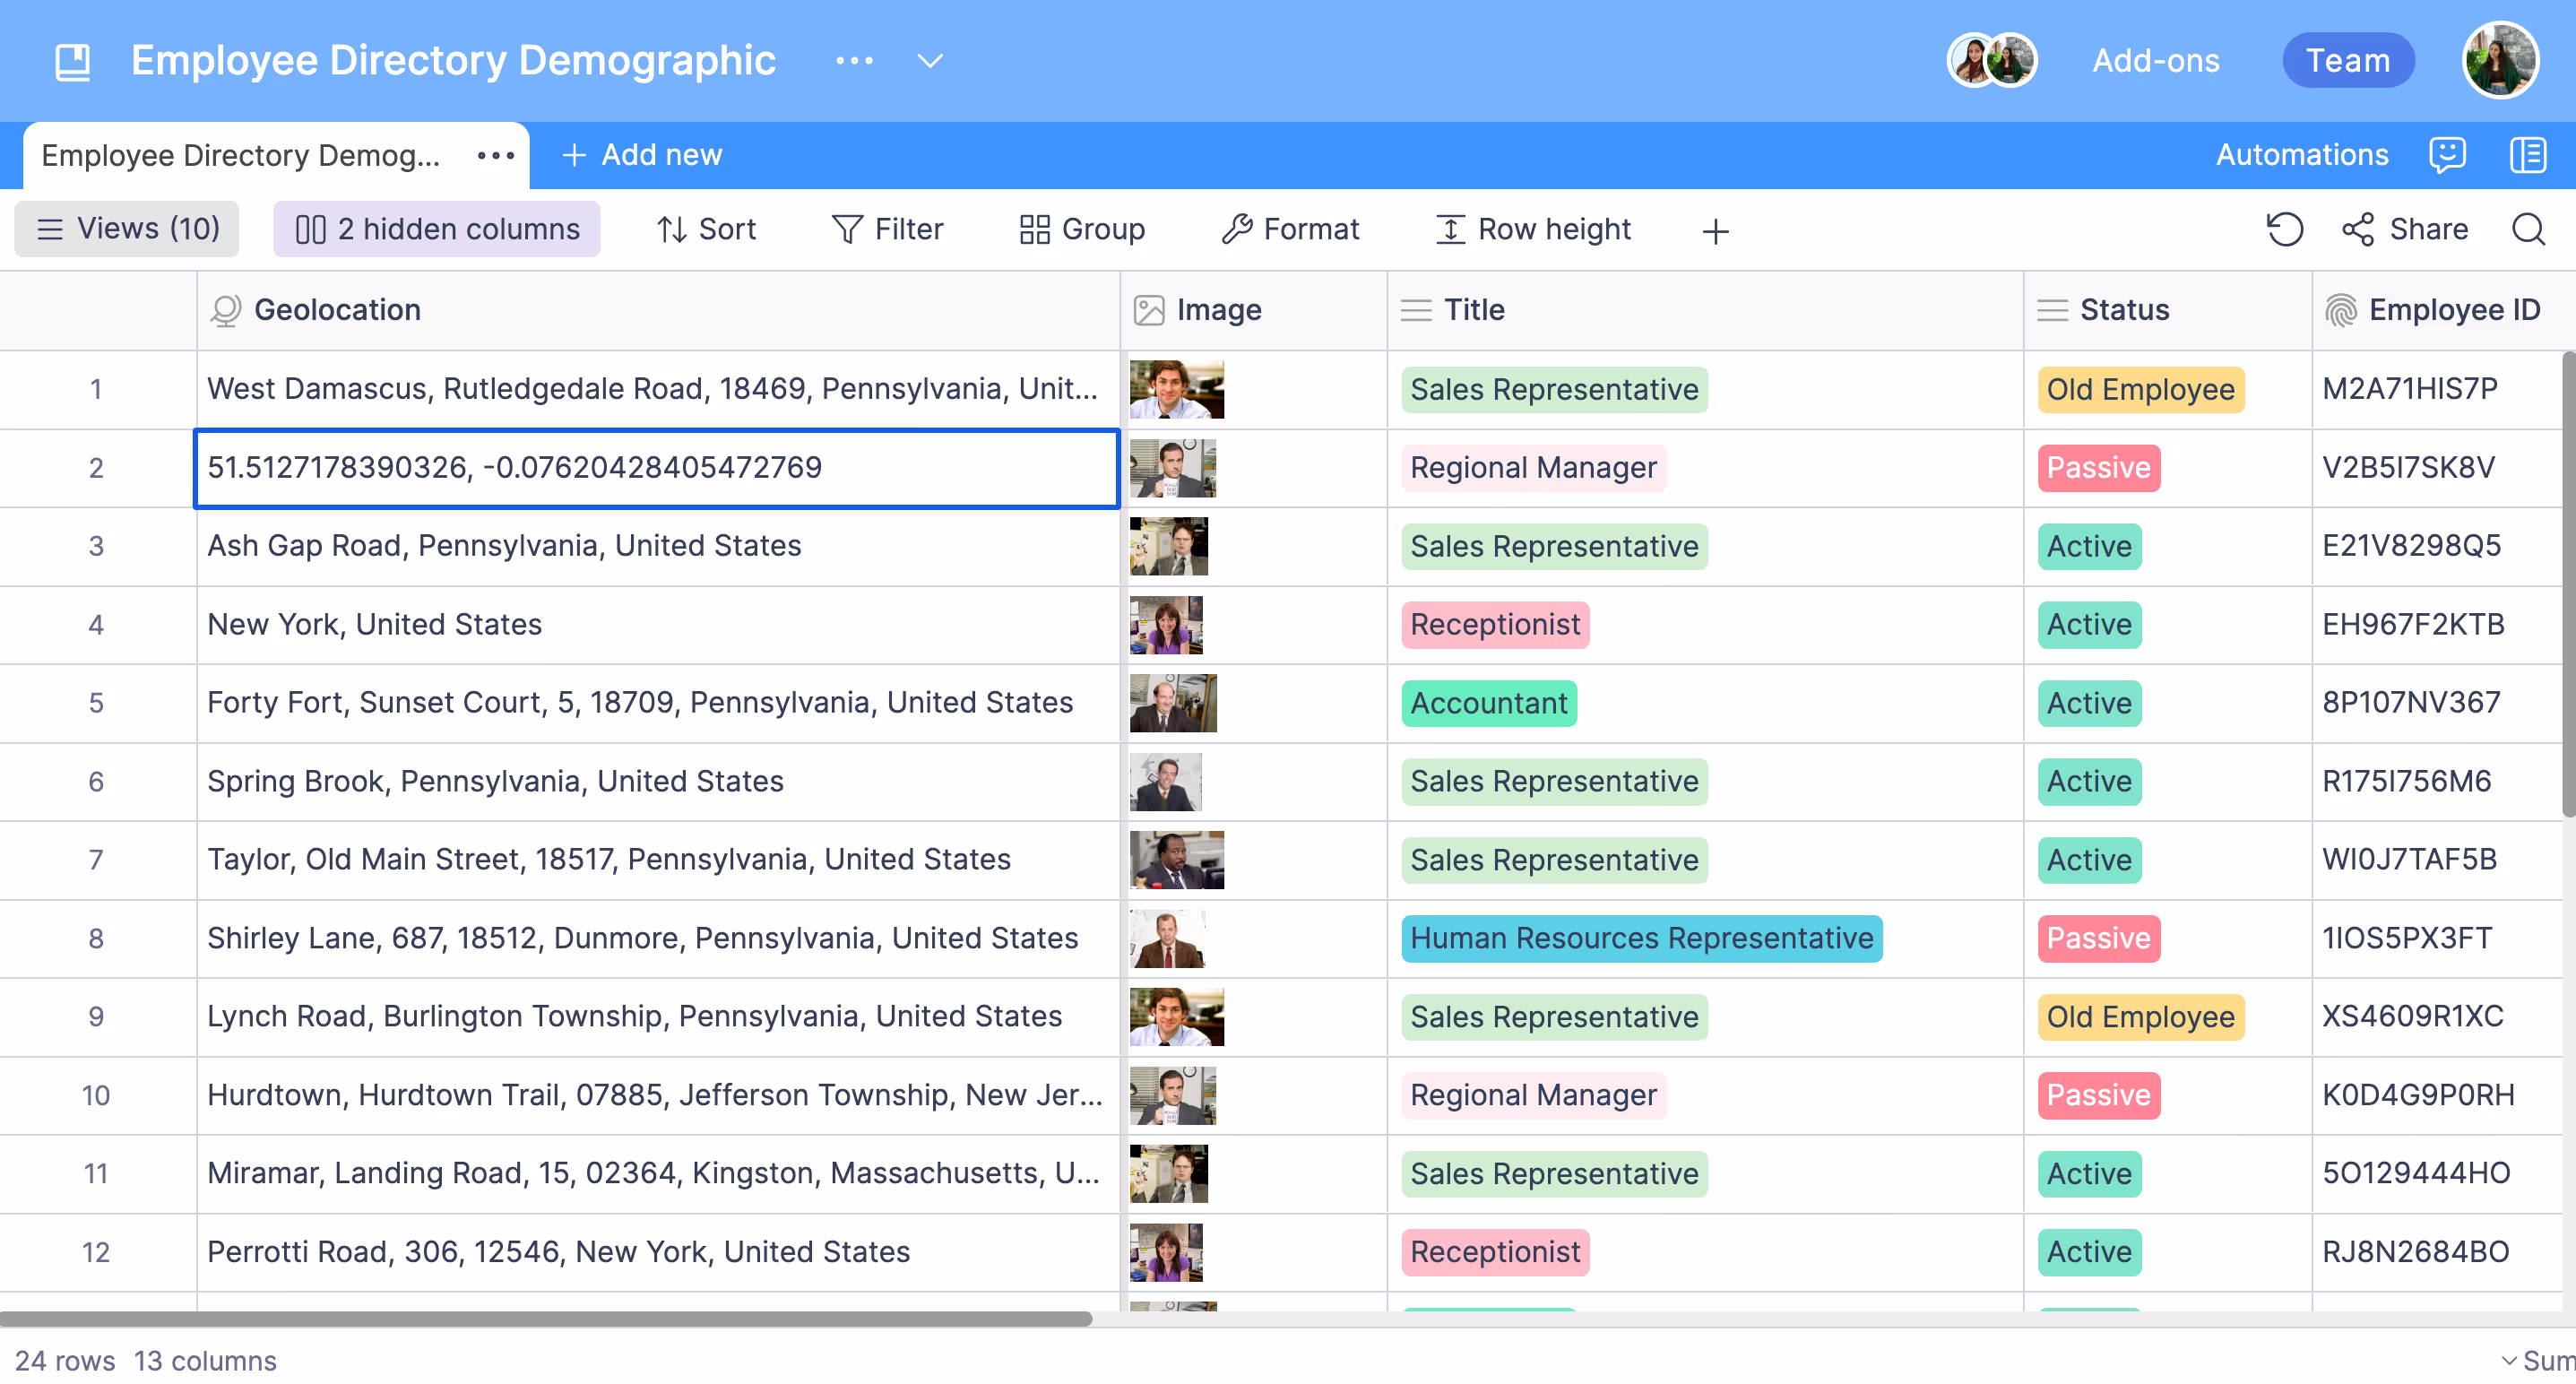
Retable's map view uses the "Geolocation" column type to display location data from your Retable spreadsheet on the map. The geolocation column type is one of Retable's +30 column types and allows you to add longitude and latitude data and exact locations to your spreadsheets. You can also search for countries and cities using the Geolocation column type. Moreover, you can automatically display the full address of any location you choose in your spreadsheets. It is super easy to copy exact longitude and latitude data from Google Maps or other map applications to Retable's Geolocation column type. If you already have this data, you can directly import it into your Retable table, so you do not need to manually add each location to your spreadsheet one by one.
How to create a geolocation column
Creating a geolocation column in your Retable spreadsheet is the first step in creating a map view. What you need to do to create a geolocation column, one of Retable's advanced column types, is quite simple.
You can create a geolocation column in your Retable table by following the steps below:
- Open your Retable project
- Create a new column by clicking on the "+" icon on the right side of your columns.
- Change your column type from the customize column panel that will open when you click on the "+" icon.
- You will see 3 categories in the column types area; basic, advanced and premium. Select the "Geolocation" column type under Advanced column types.
- Click the "Save" button at the bottom right of the pop-up window.
Are you a visual learner? To get a smooth start, check out our advanced column types video and easily create your Geolocation column.
After creating your geolocation column, there are 5 methods to add your locations to your table;
- Search by city
- Search by country
- Search with longitude and latitude data separately
- Search with long-lat data
- Pin directly on the map
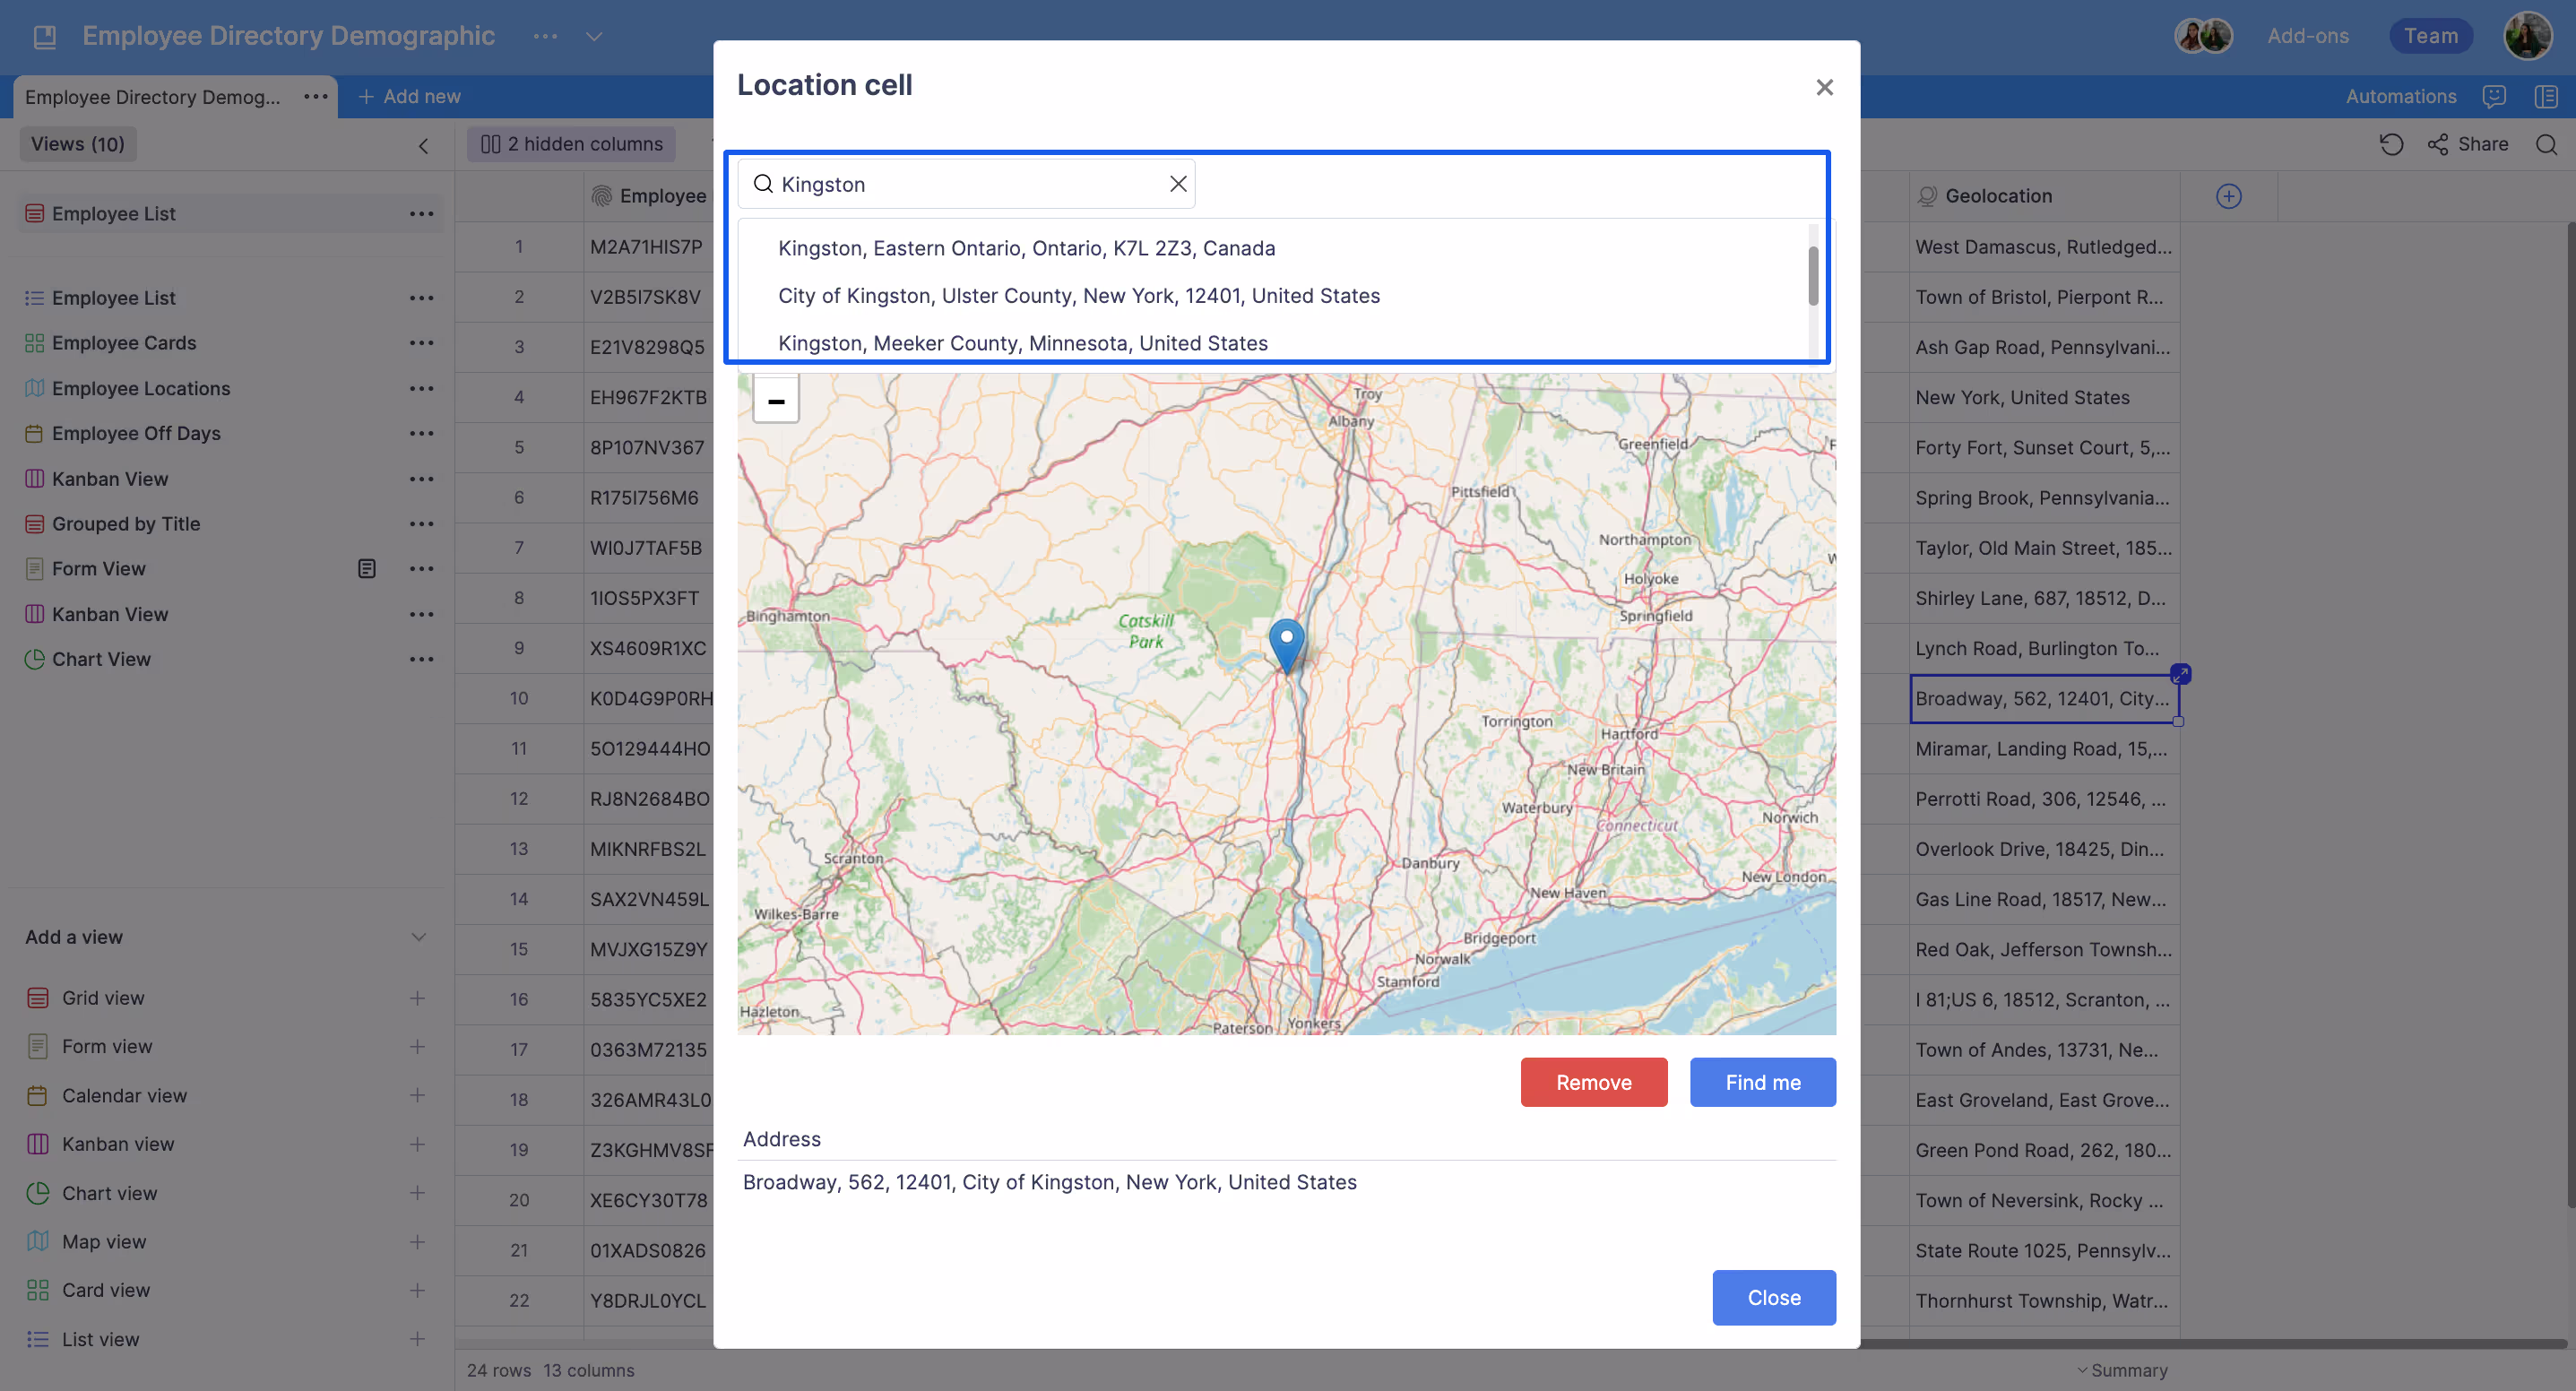
Search by city
When you click on any cell in your Geolocation column, you will see the detail screen as in the image below. You can search for a city directly from the search bar on this screen. The city you search for will automatically be highlighted on the map. You can then pin any location by clicking on any location within this city.
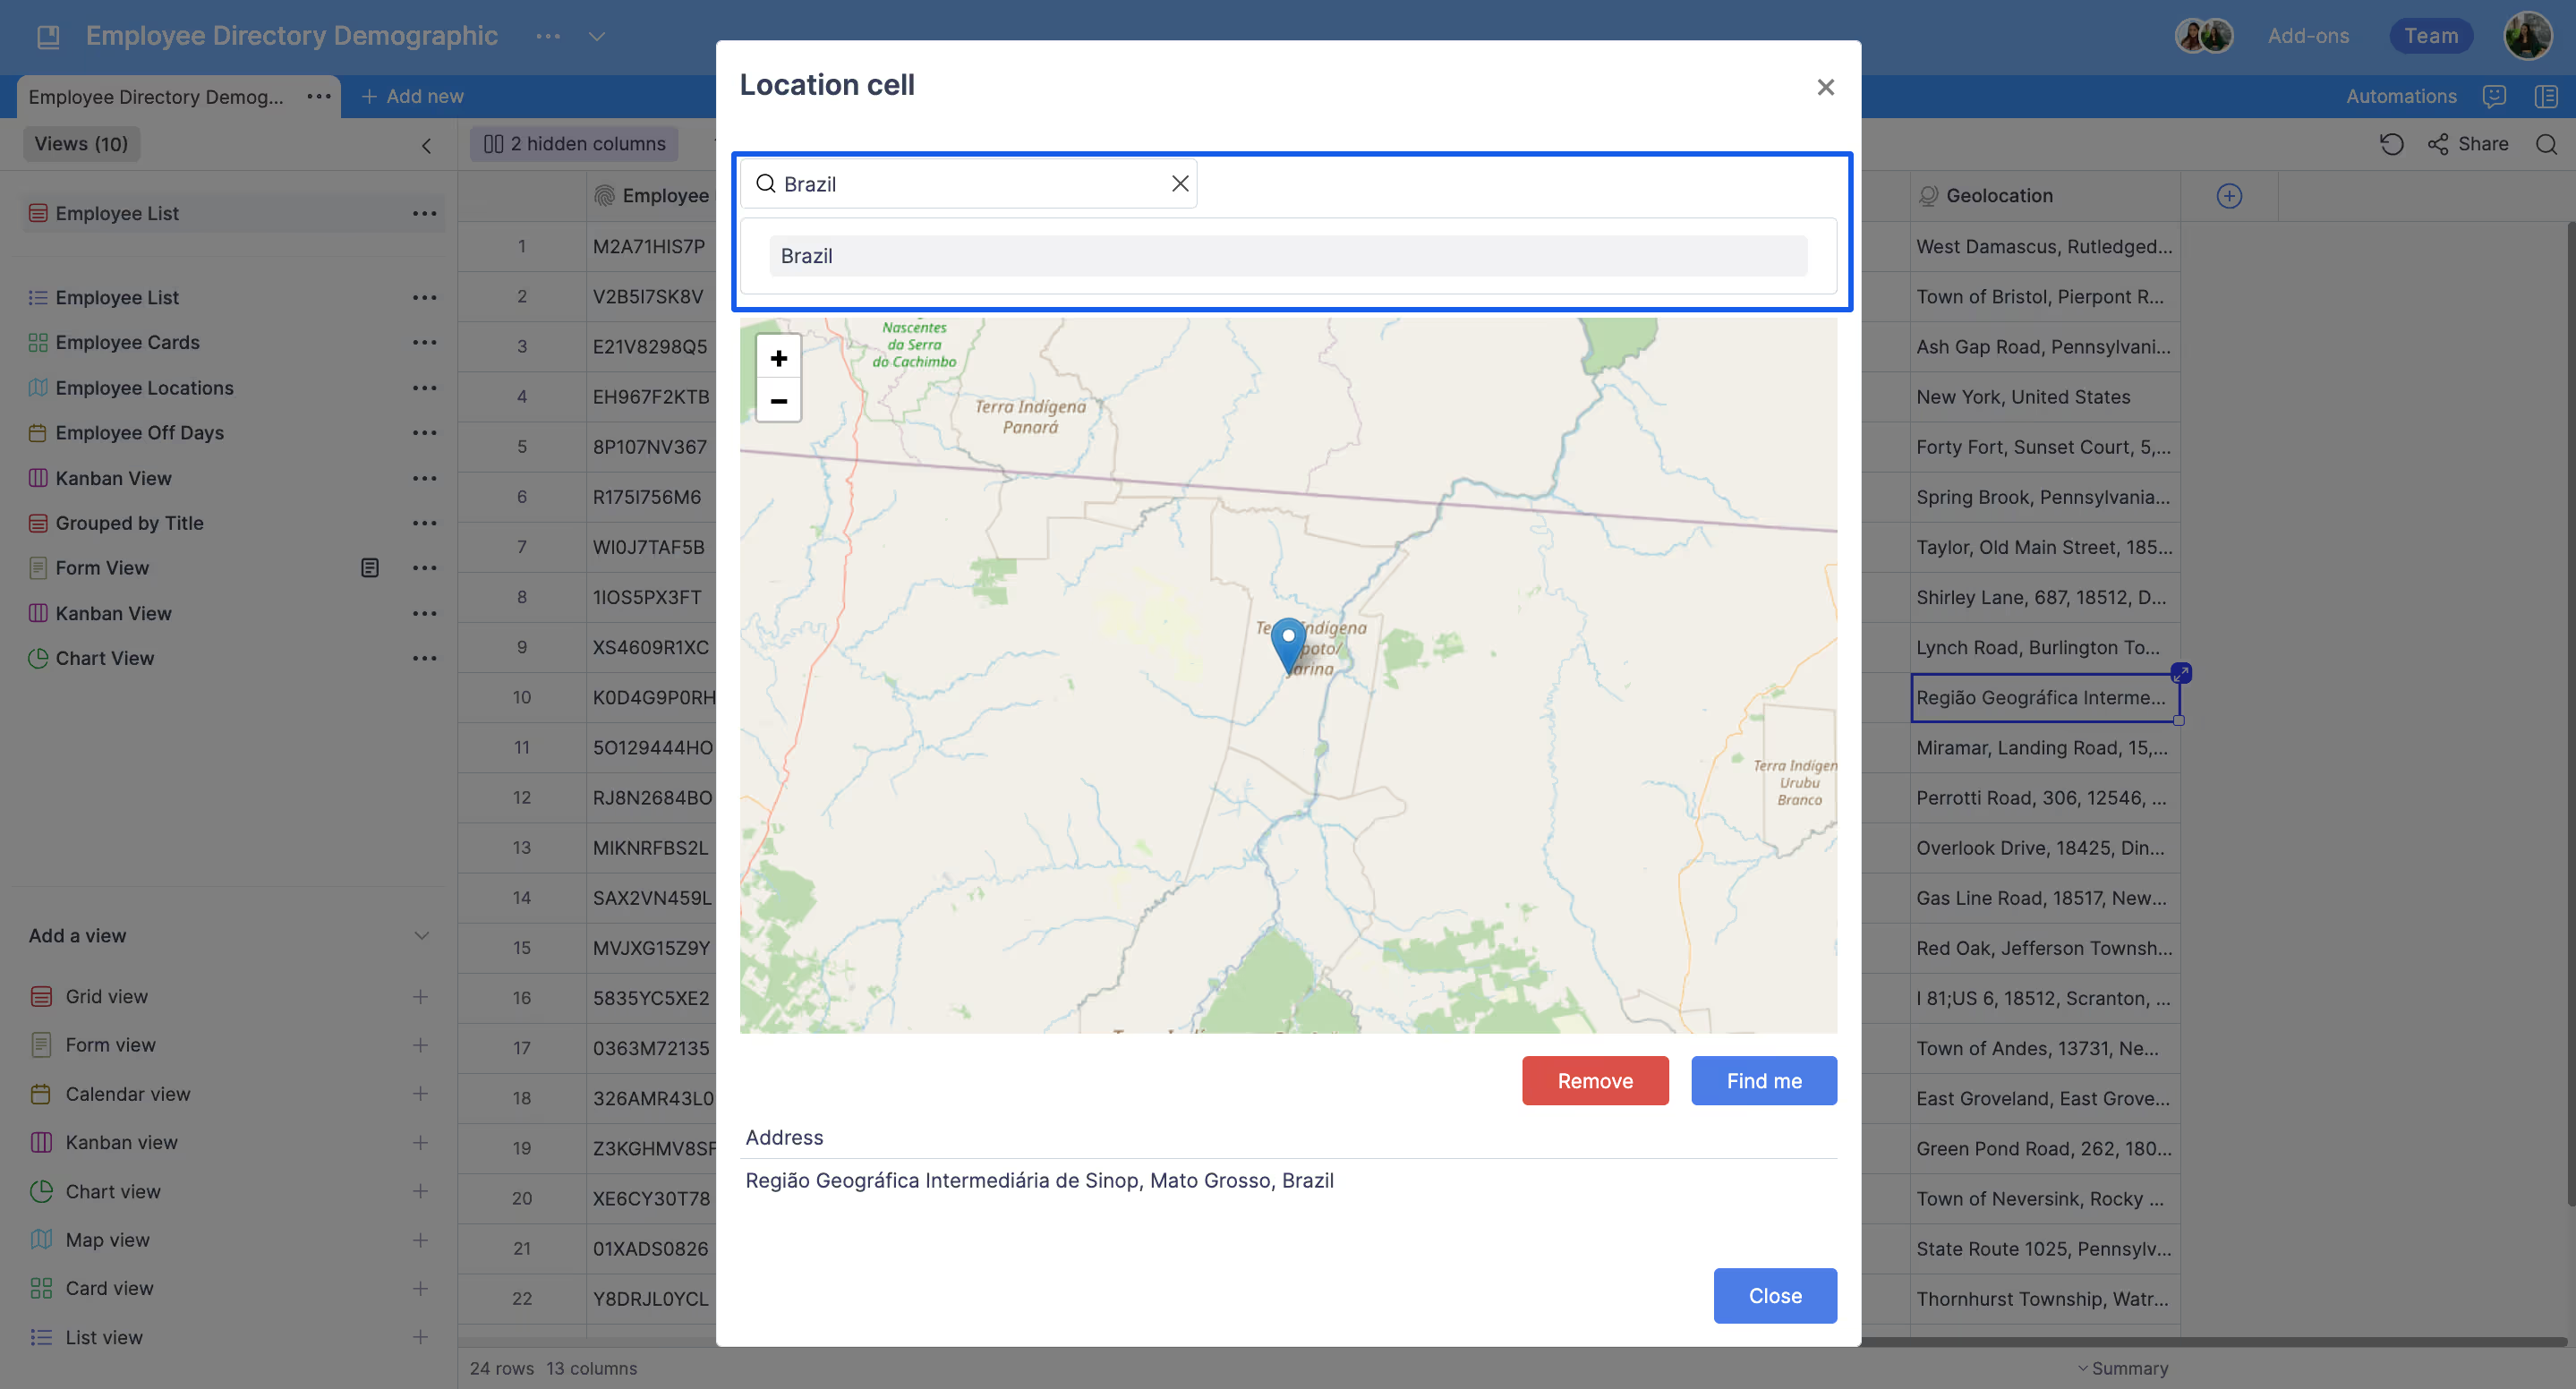
Search by country
When you click on any cell in your Geolocation column, you will see the detail screen as in the image below. You can search for a country directly from the search bar on this screen. The country you search for will automatically be highlighted on the map. You can then pin any location by clicking on any location within this country.
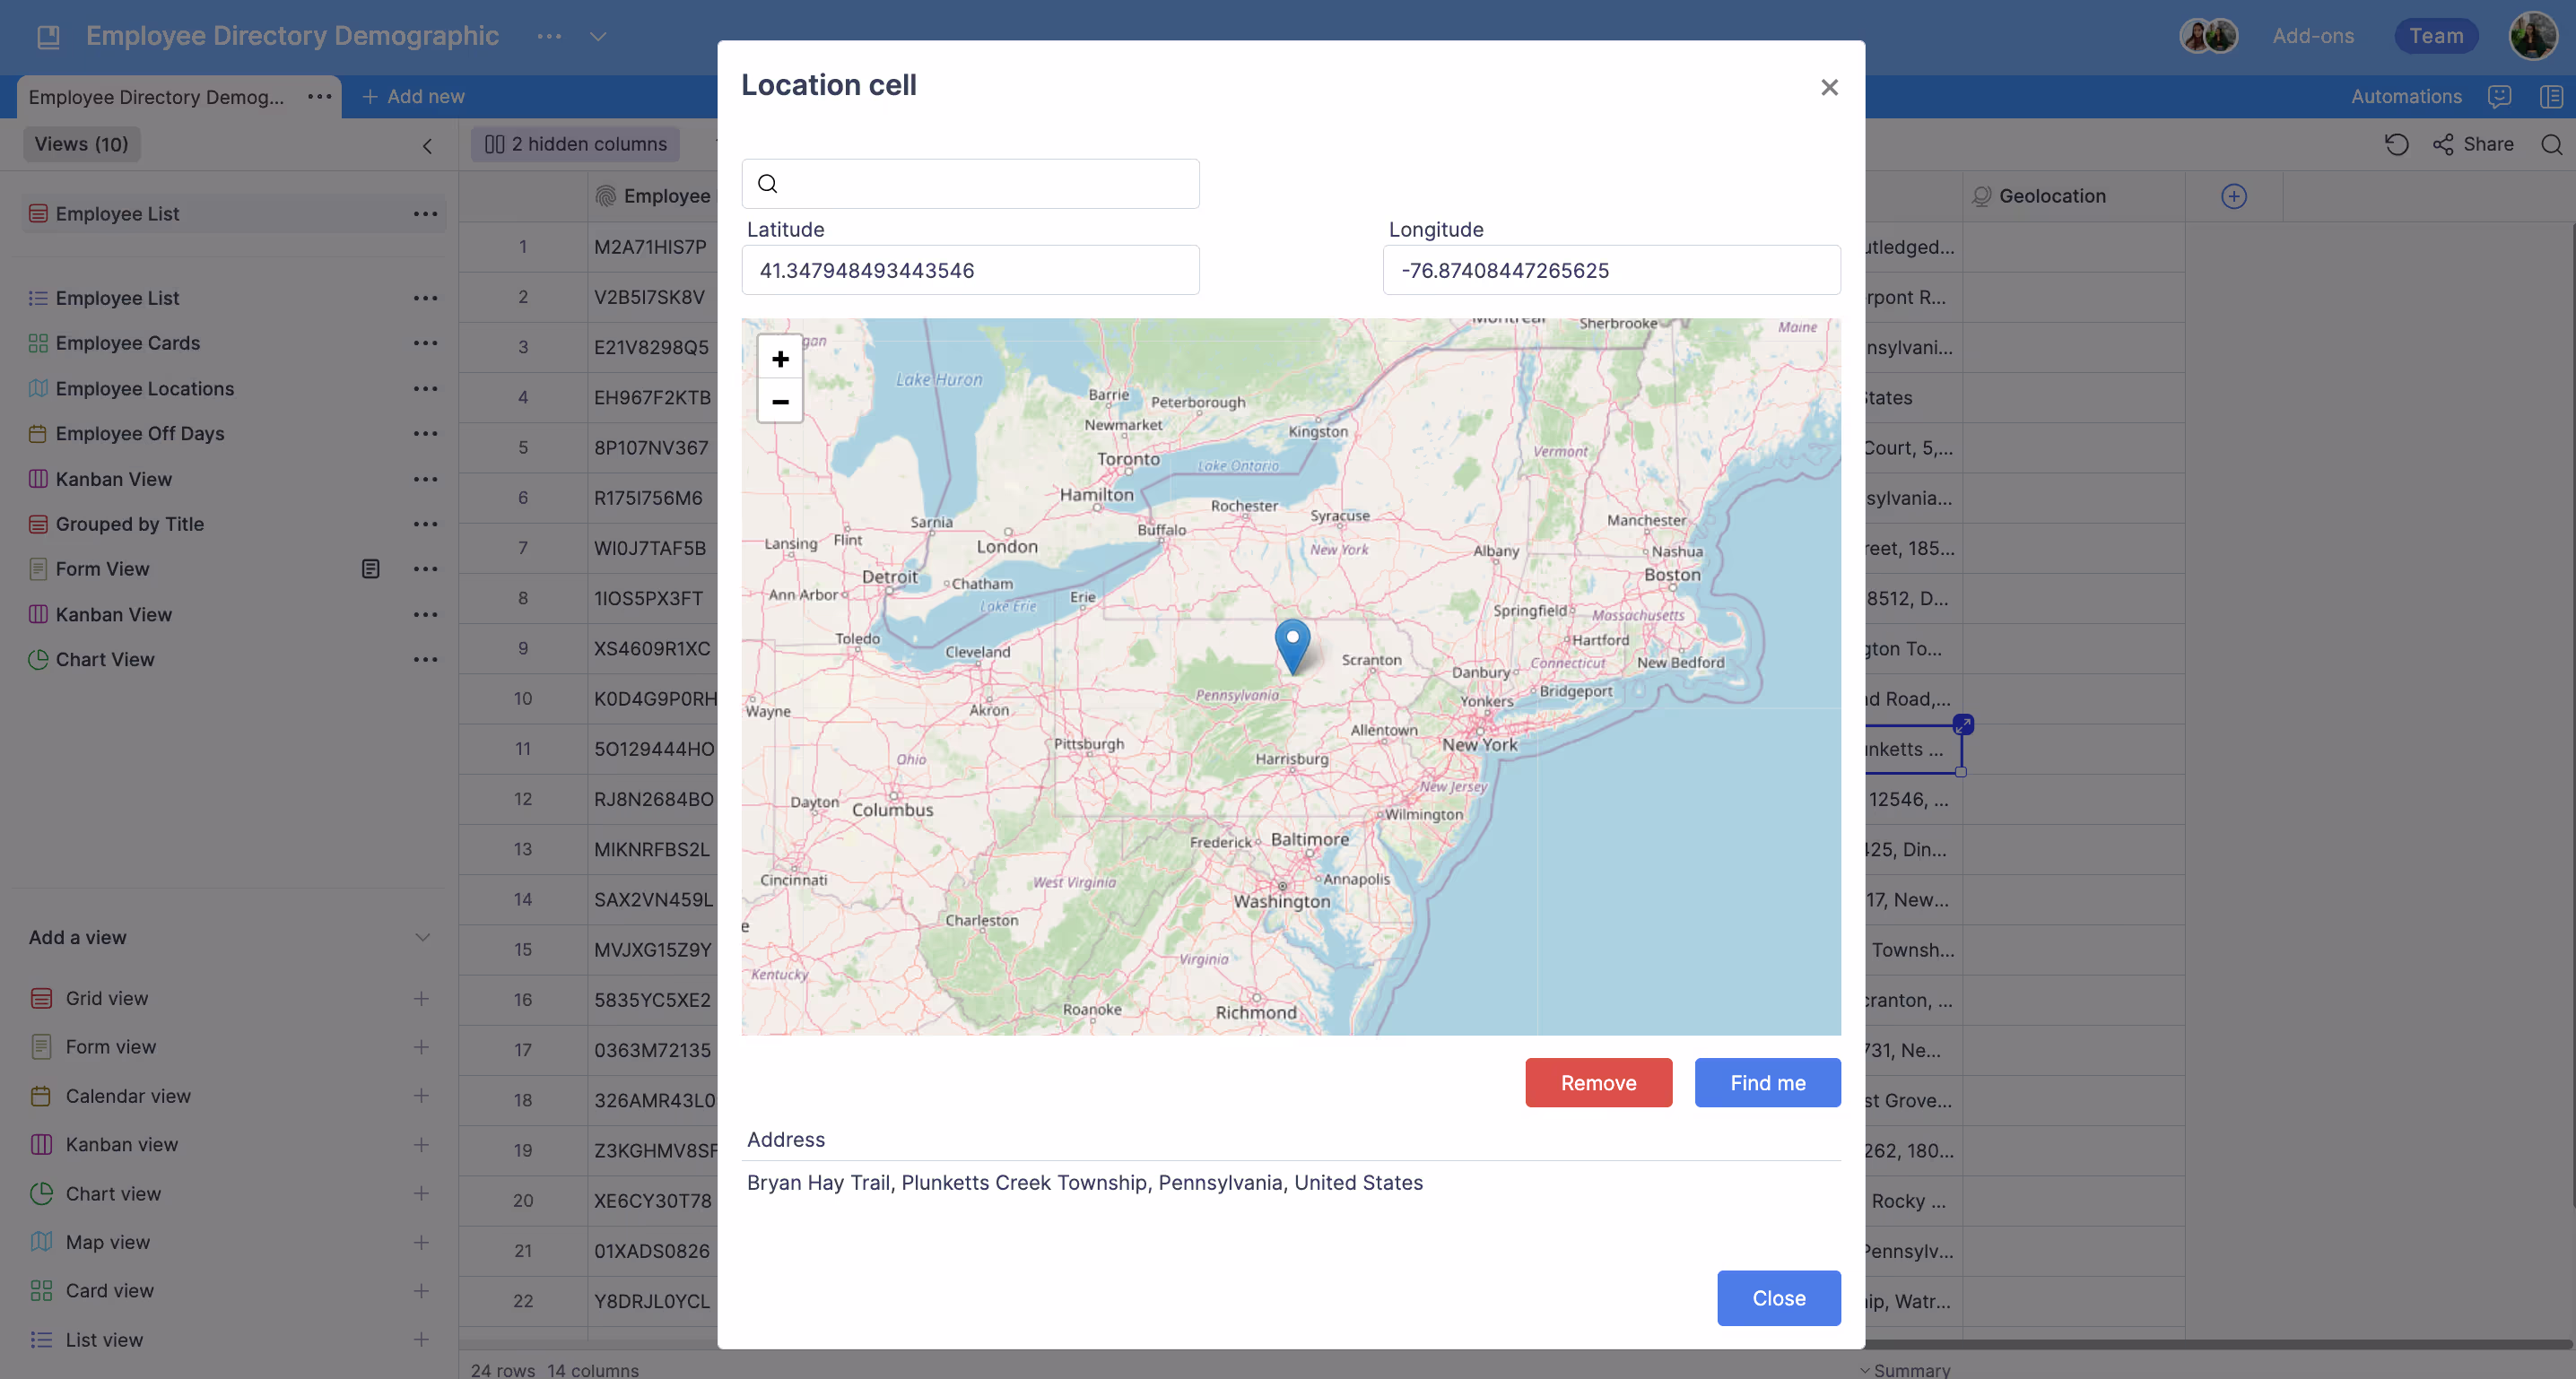
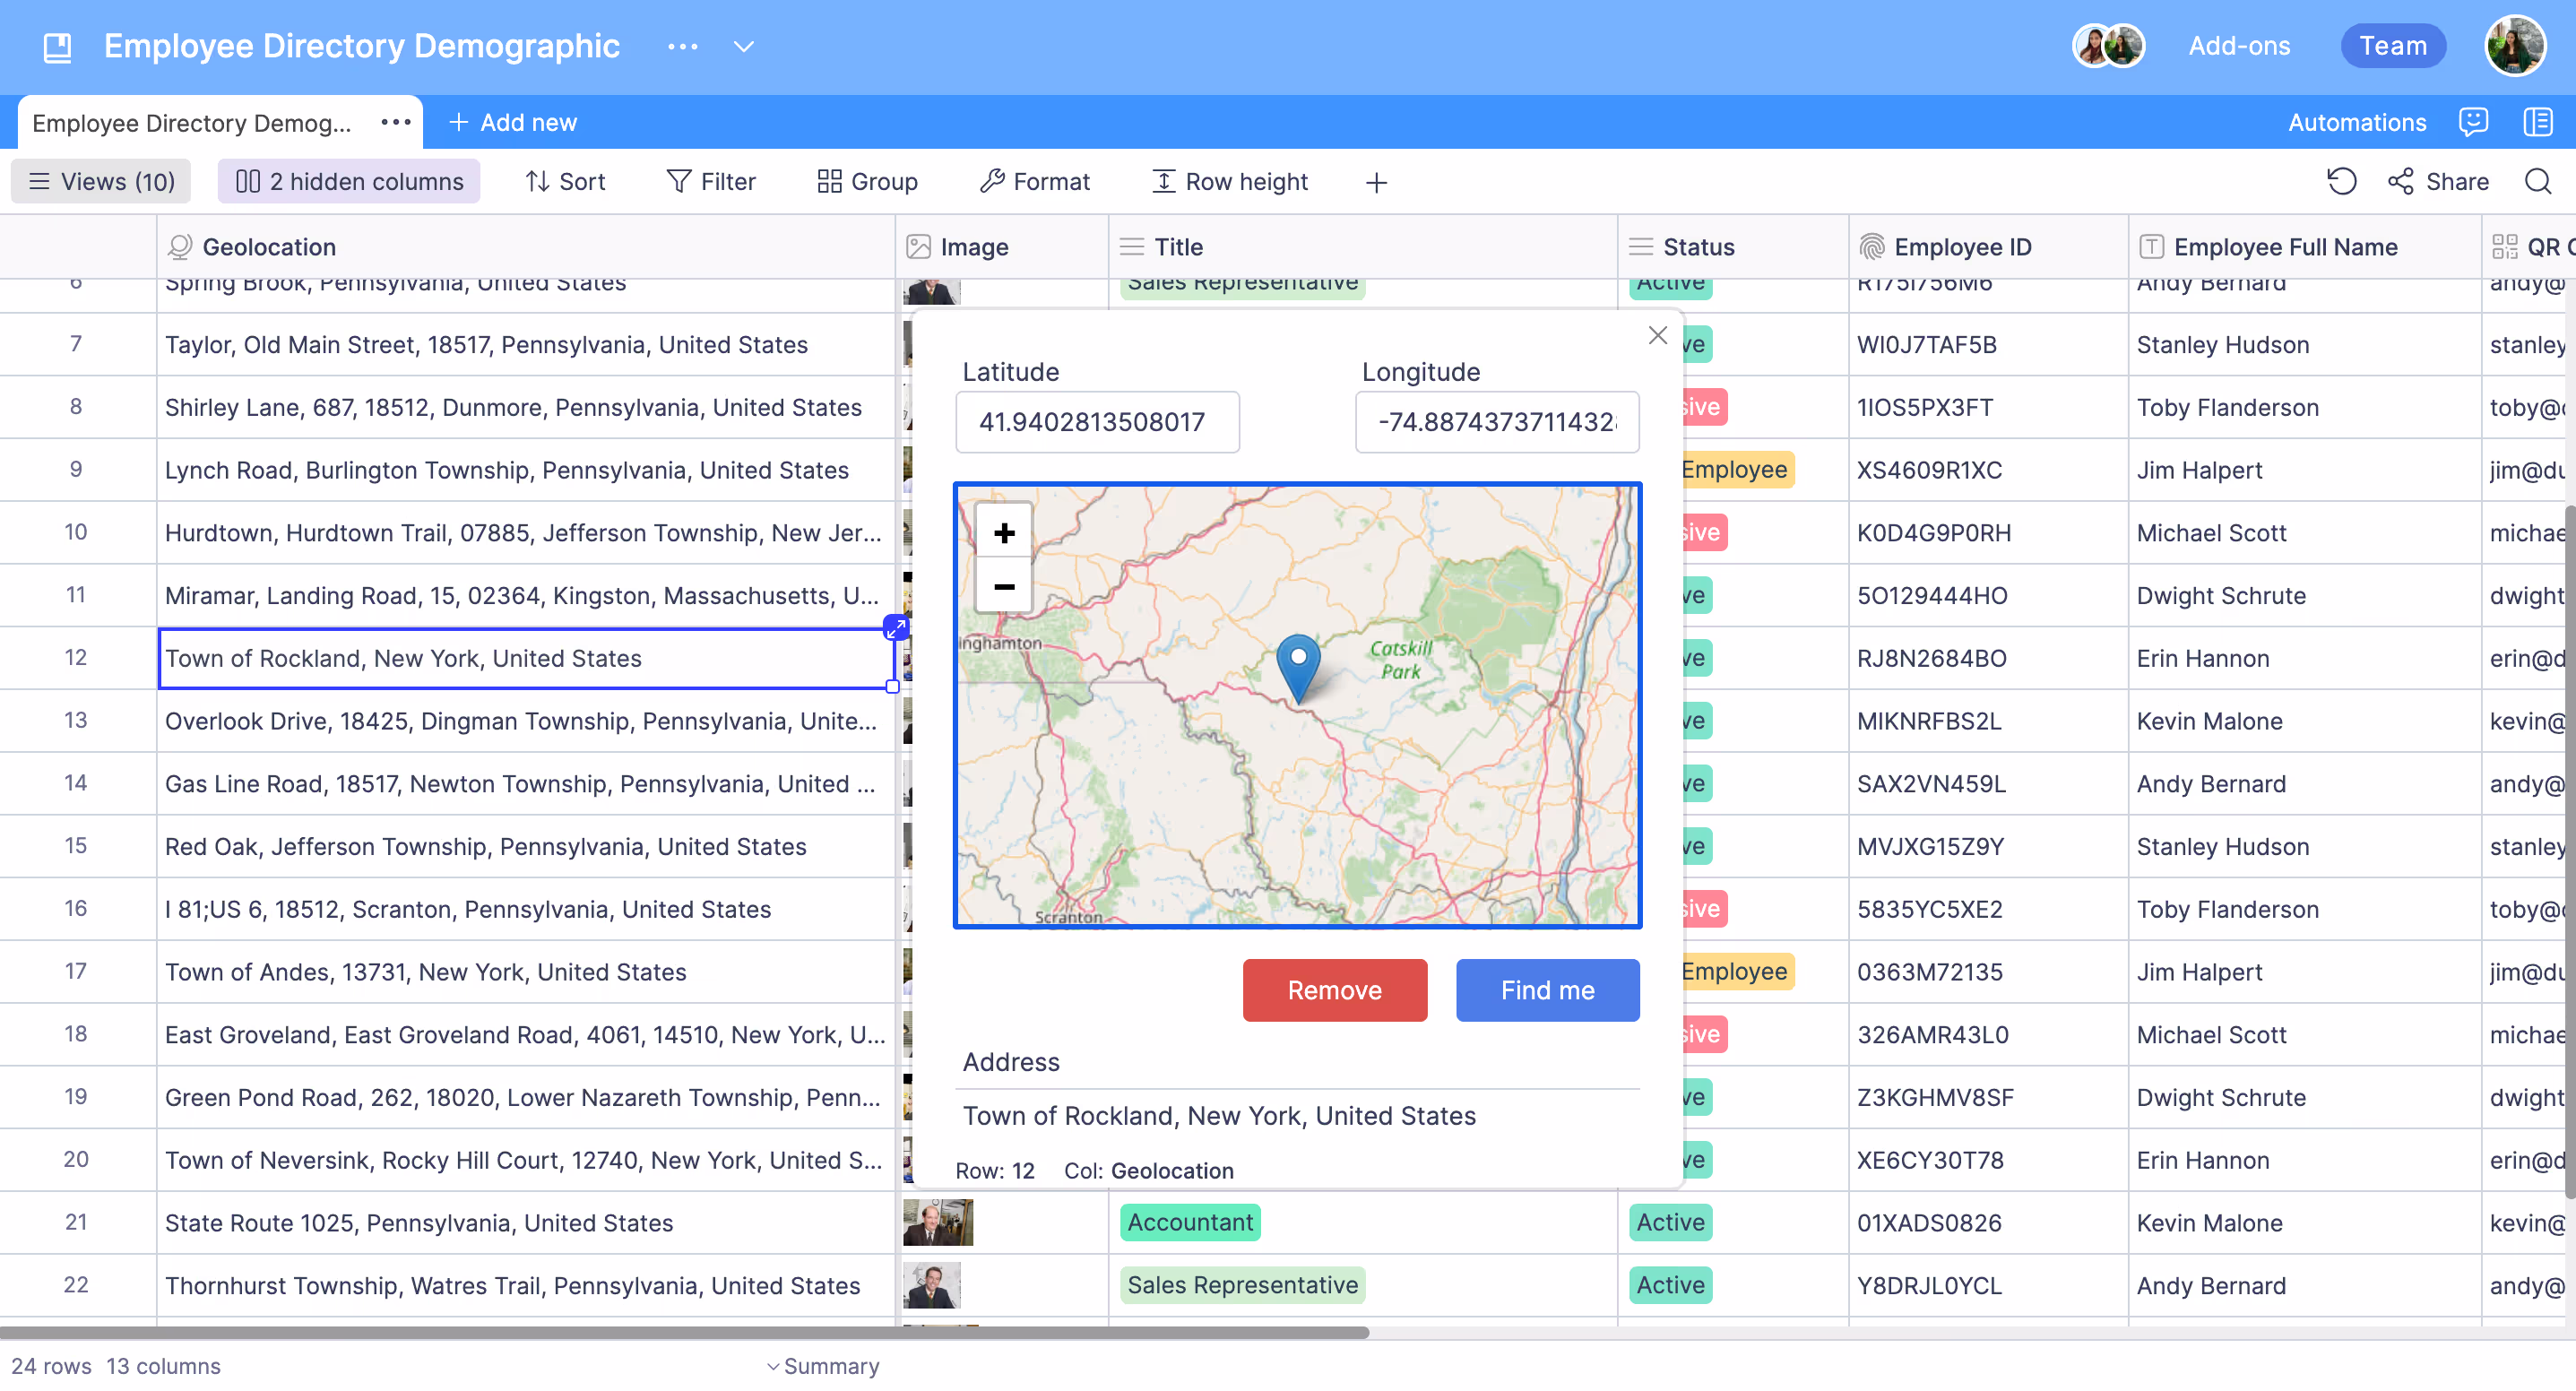
Search with longitude and latitude data separately
When you click on any cell in your Geolocation column, you will see the detail screen as in the image below. You can search for a longitude and latitude data separately directly from the search bars on this screen. The location you search for will automatically be highlighted on the map.
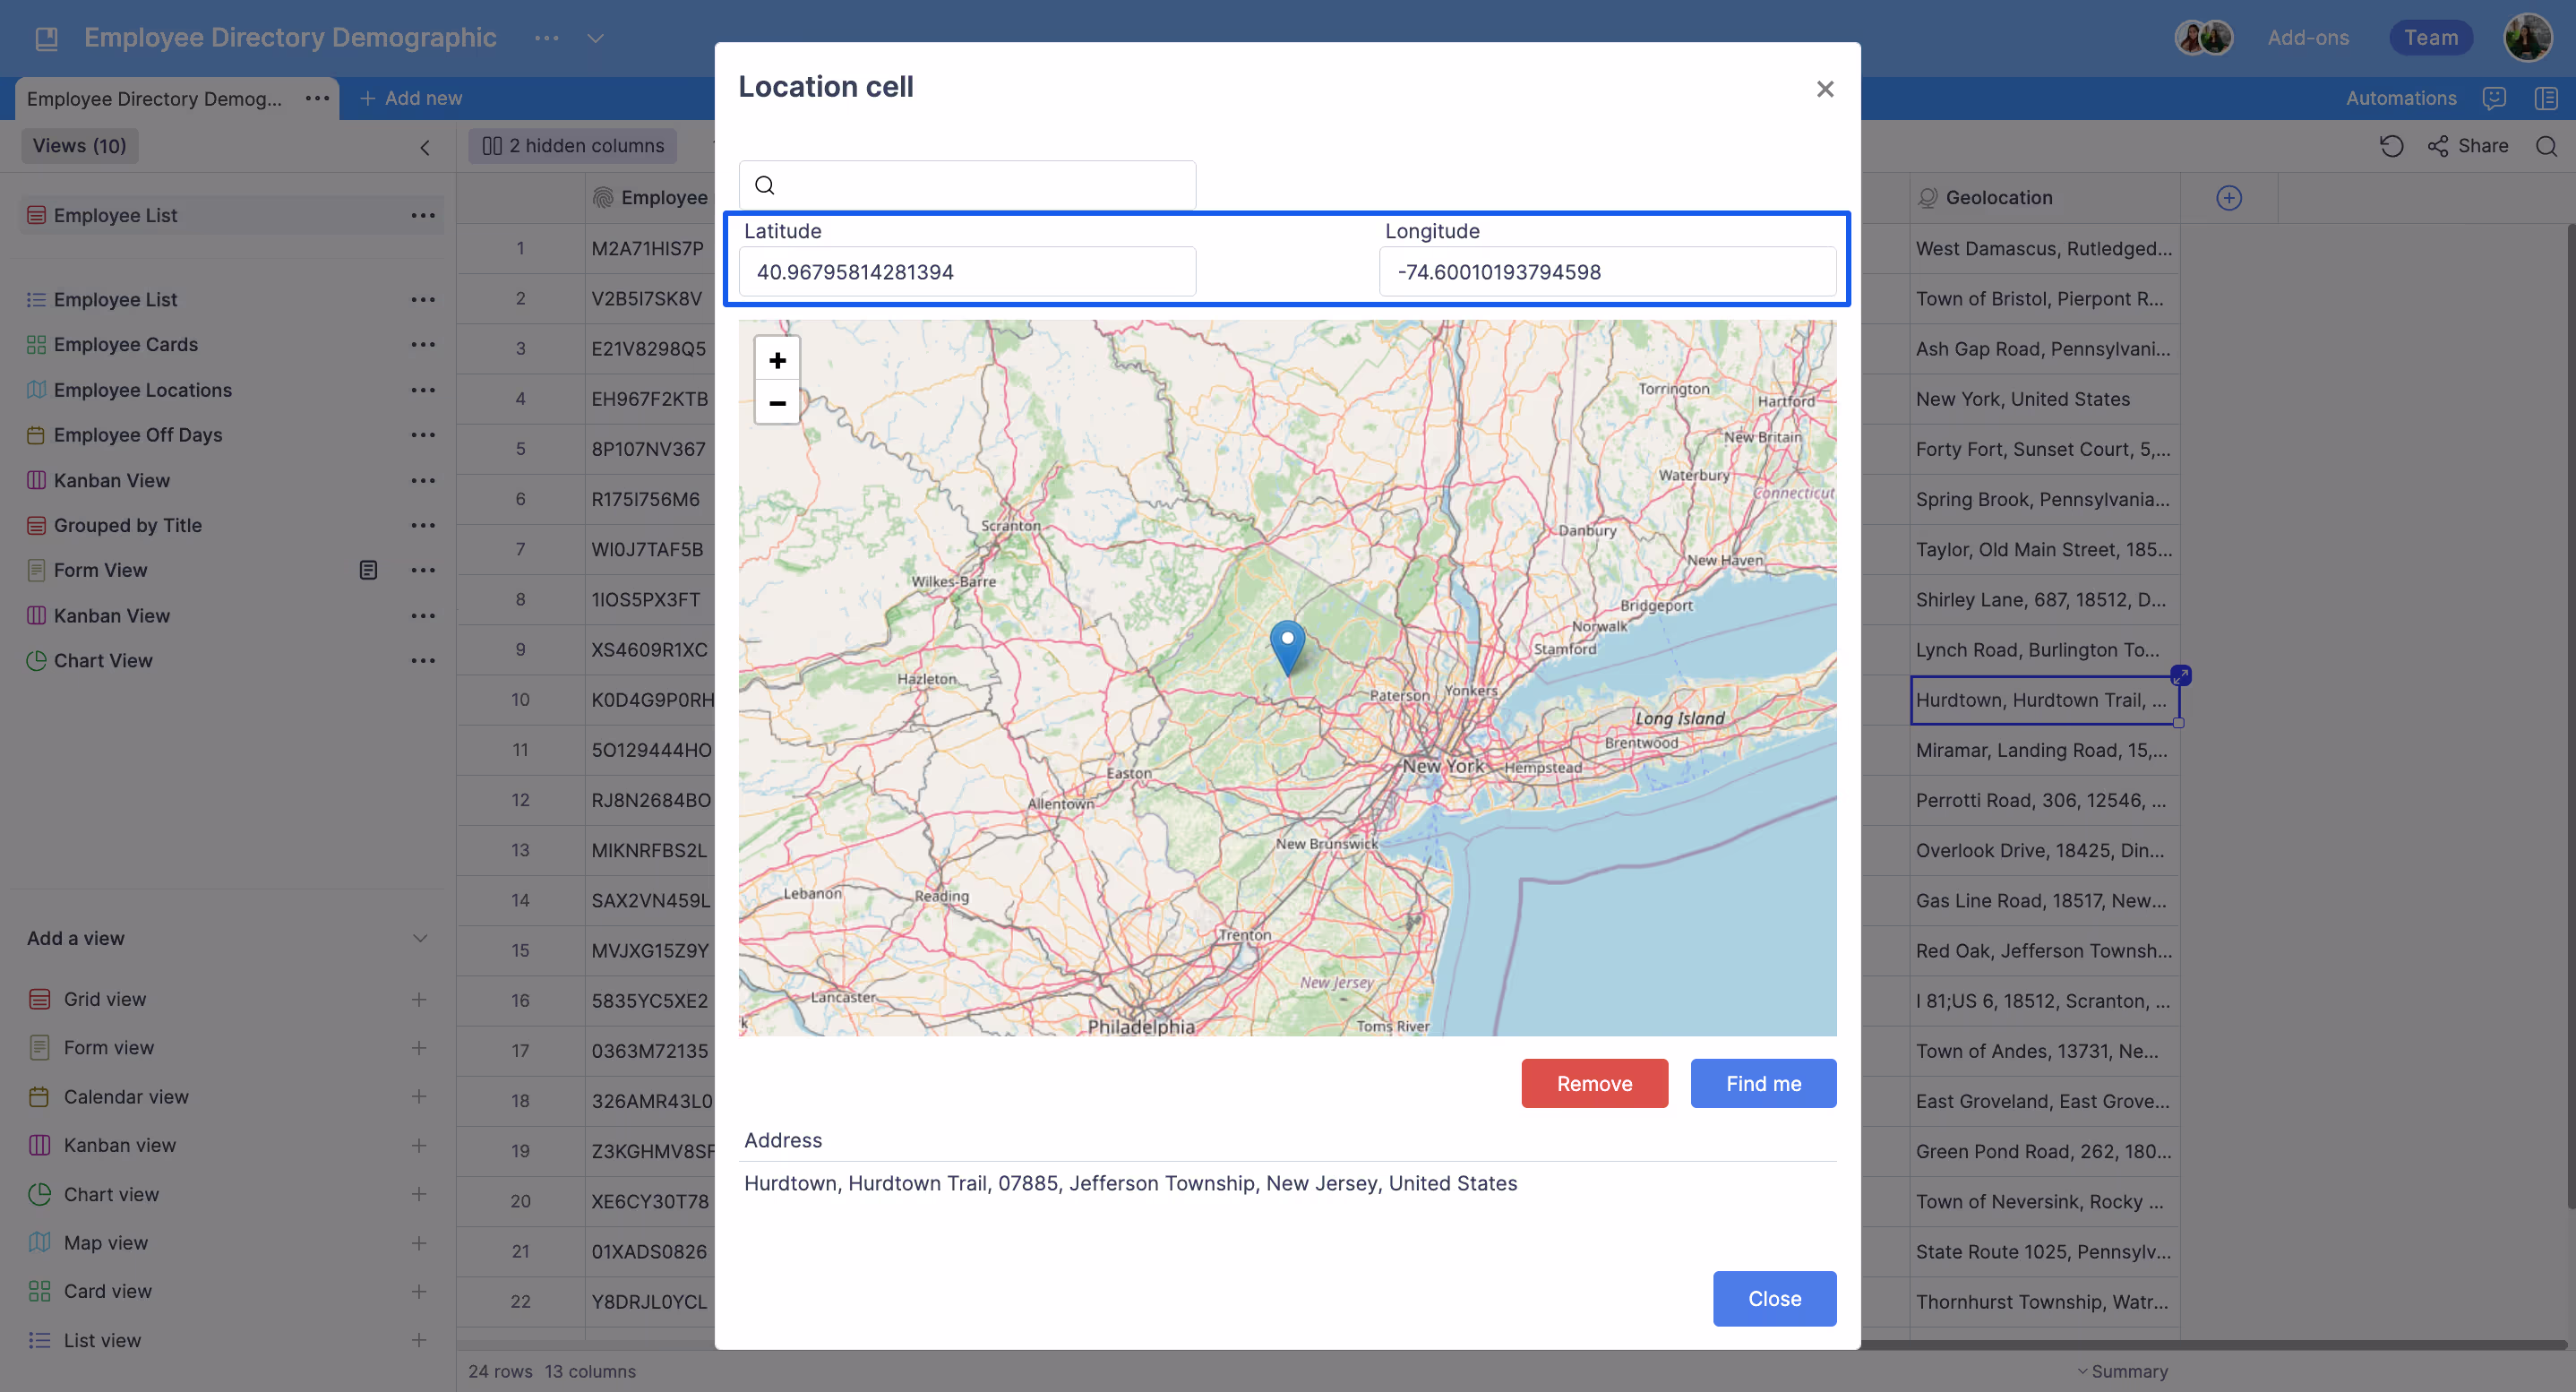
Search with long-lat data
Unlike other methods, in this method, you can directly add long-lat data that you have copied from a different map tool or written manually to the relevant cell without opening the cell detail pop-up. And Retable pins directly to this location on the map.
Example format: 51.5127178390326, -0.07620428405472769 (Do not forget to use comma to separate latitude and longitude data)
Pin directly on the map
Pin directly on the map is one of the easiest ways to manually add data to your geolocation column. You can simply select a location from the map that opens when clicking on a cell in your geolocation column. When you close the cell detail window, the location you have selected is automatically pinned on the map and the latitude and longitude data and full address information of this location are automatically added to your spreadsheet.
How to create a Retable map view
In the previous sections of our "How to create interactive maps from an online spreadsheet" guide, we have learned how you can create a geolocation column and add locations to your geolocation column. We mentioned that the first step in creating a map view is to create a geolocation column because when you want to create a map view, Retable asks you according to which geolocation column you want to stack your map view. A table can contain more than one geolocation column. However, when creating your map view, you must choose according to which geolocation column you will stack this map view. Thus, Retable will show you the locations in the geolocation column you selected to create your map. Remember that you can create an unlimited number of map views and you have the opportunity to stack different geolocation columns in each map view.
Now, let's take a look at how you can create a map view with your geolocation column.
.avif)
- Open the "Views" window on the left side of your table.
- Go to the "Add a view" section at the bottom of the "Views" window
- Select "Map view" from the "Add a view" section.
- Then select the geolocation column you want to stack on your map from the "Choose a location column" field in the pop-up screen.
- After making your selection, click the "Done" button.
- Now you can easily view all locations in your geolocation column on the map view.
After completing the steps above, all location data in the geolocation column of your spreadsheet will be automatically displayed on the map. Moreover, when you add a new location data to your spreadsheet, this location data will be automatically pinned on your map.
Below you can see the embedded version of a sample interactive Retable map.
You can easily share the maps you create with the location data in your spreadsheets publicly or embed them on your website.
Check out our map view tutorial video to easily create your Retable map view in seconds!
How to add data to your Retable map view with Retable online forms
We have mentioned various methods of adding locations in your Retable map view. Basically, the map view is fed from geolocation data in your spreadsheets, and every method you use to add data to your spreadsheets is also valid for your map view. You can consider your Retable spreadsheets as a database for your map view.
One of the most preferred methods of adding data to map view is Retable online forms. Retable online forms help you collect data without sharing your spreadsheets publicly or privately. It basically creates a form view of your spreadsheet and allows you to display any columns you want as a form question.
.avif)
By following the steps below, you can create a form view for your online spreadsheet and enter data into your spreadsheets via the form.
- Open the "Views" window on the left side of your table.
- Go to the "Add a view" section at the bottom of the "Views" window
- Select "Form view" from the "Add a view" section.
If you need more help on how to customize your Retable forms, you can check our "How to use form view" article.
We mentioned that the first step in creating a map view is to have a geolocation column. The geolocation column on your Retable spreadsheet will also appear as a question on your form. This way, the people you share your form with can add their locations to this column. When you share your form, your geolocation column will look like below.
.avif)
Thus, people can add their locations to your table via the form. If they click on the "Find me" button, the data of their location will be pinned automatically. Or they can choose their location on the map using other methods we have shown in the section above. When the form is submitted, the response of this form will be added to your Retable table as a row and simultaneously synchronized with your Retable form view.
How to relocate your placemarks
Changing the location of the pins on your retable map is super easy. You can follow the steps below to relocate the pins in your map view.
- Click a pin on your map
- Click the "Relocate" button at the bottom of the pop-up window that opens when you click on the pin.
- Drag and drop your pin
- After moving the pin to your desired location, click the "Save" button.
- If you decide not to relocate your pin, click the "go back to location" button. Thus, your pin will return to its previous location.
How to customize Retable map view
There are various ways to customize your Retable map view. For instance, instead of seeing all the locations in your table in your map view, you may want to see only some filtered locations. It is possible to make filters for this. You can also customize the data you display in the pop-ups that open when you click on the pins in your map view. Here are some customizations you can make in the Retable map view.
Filtering
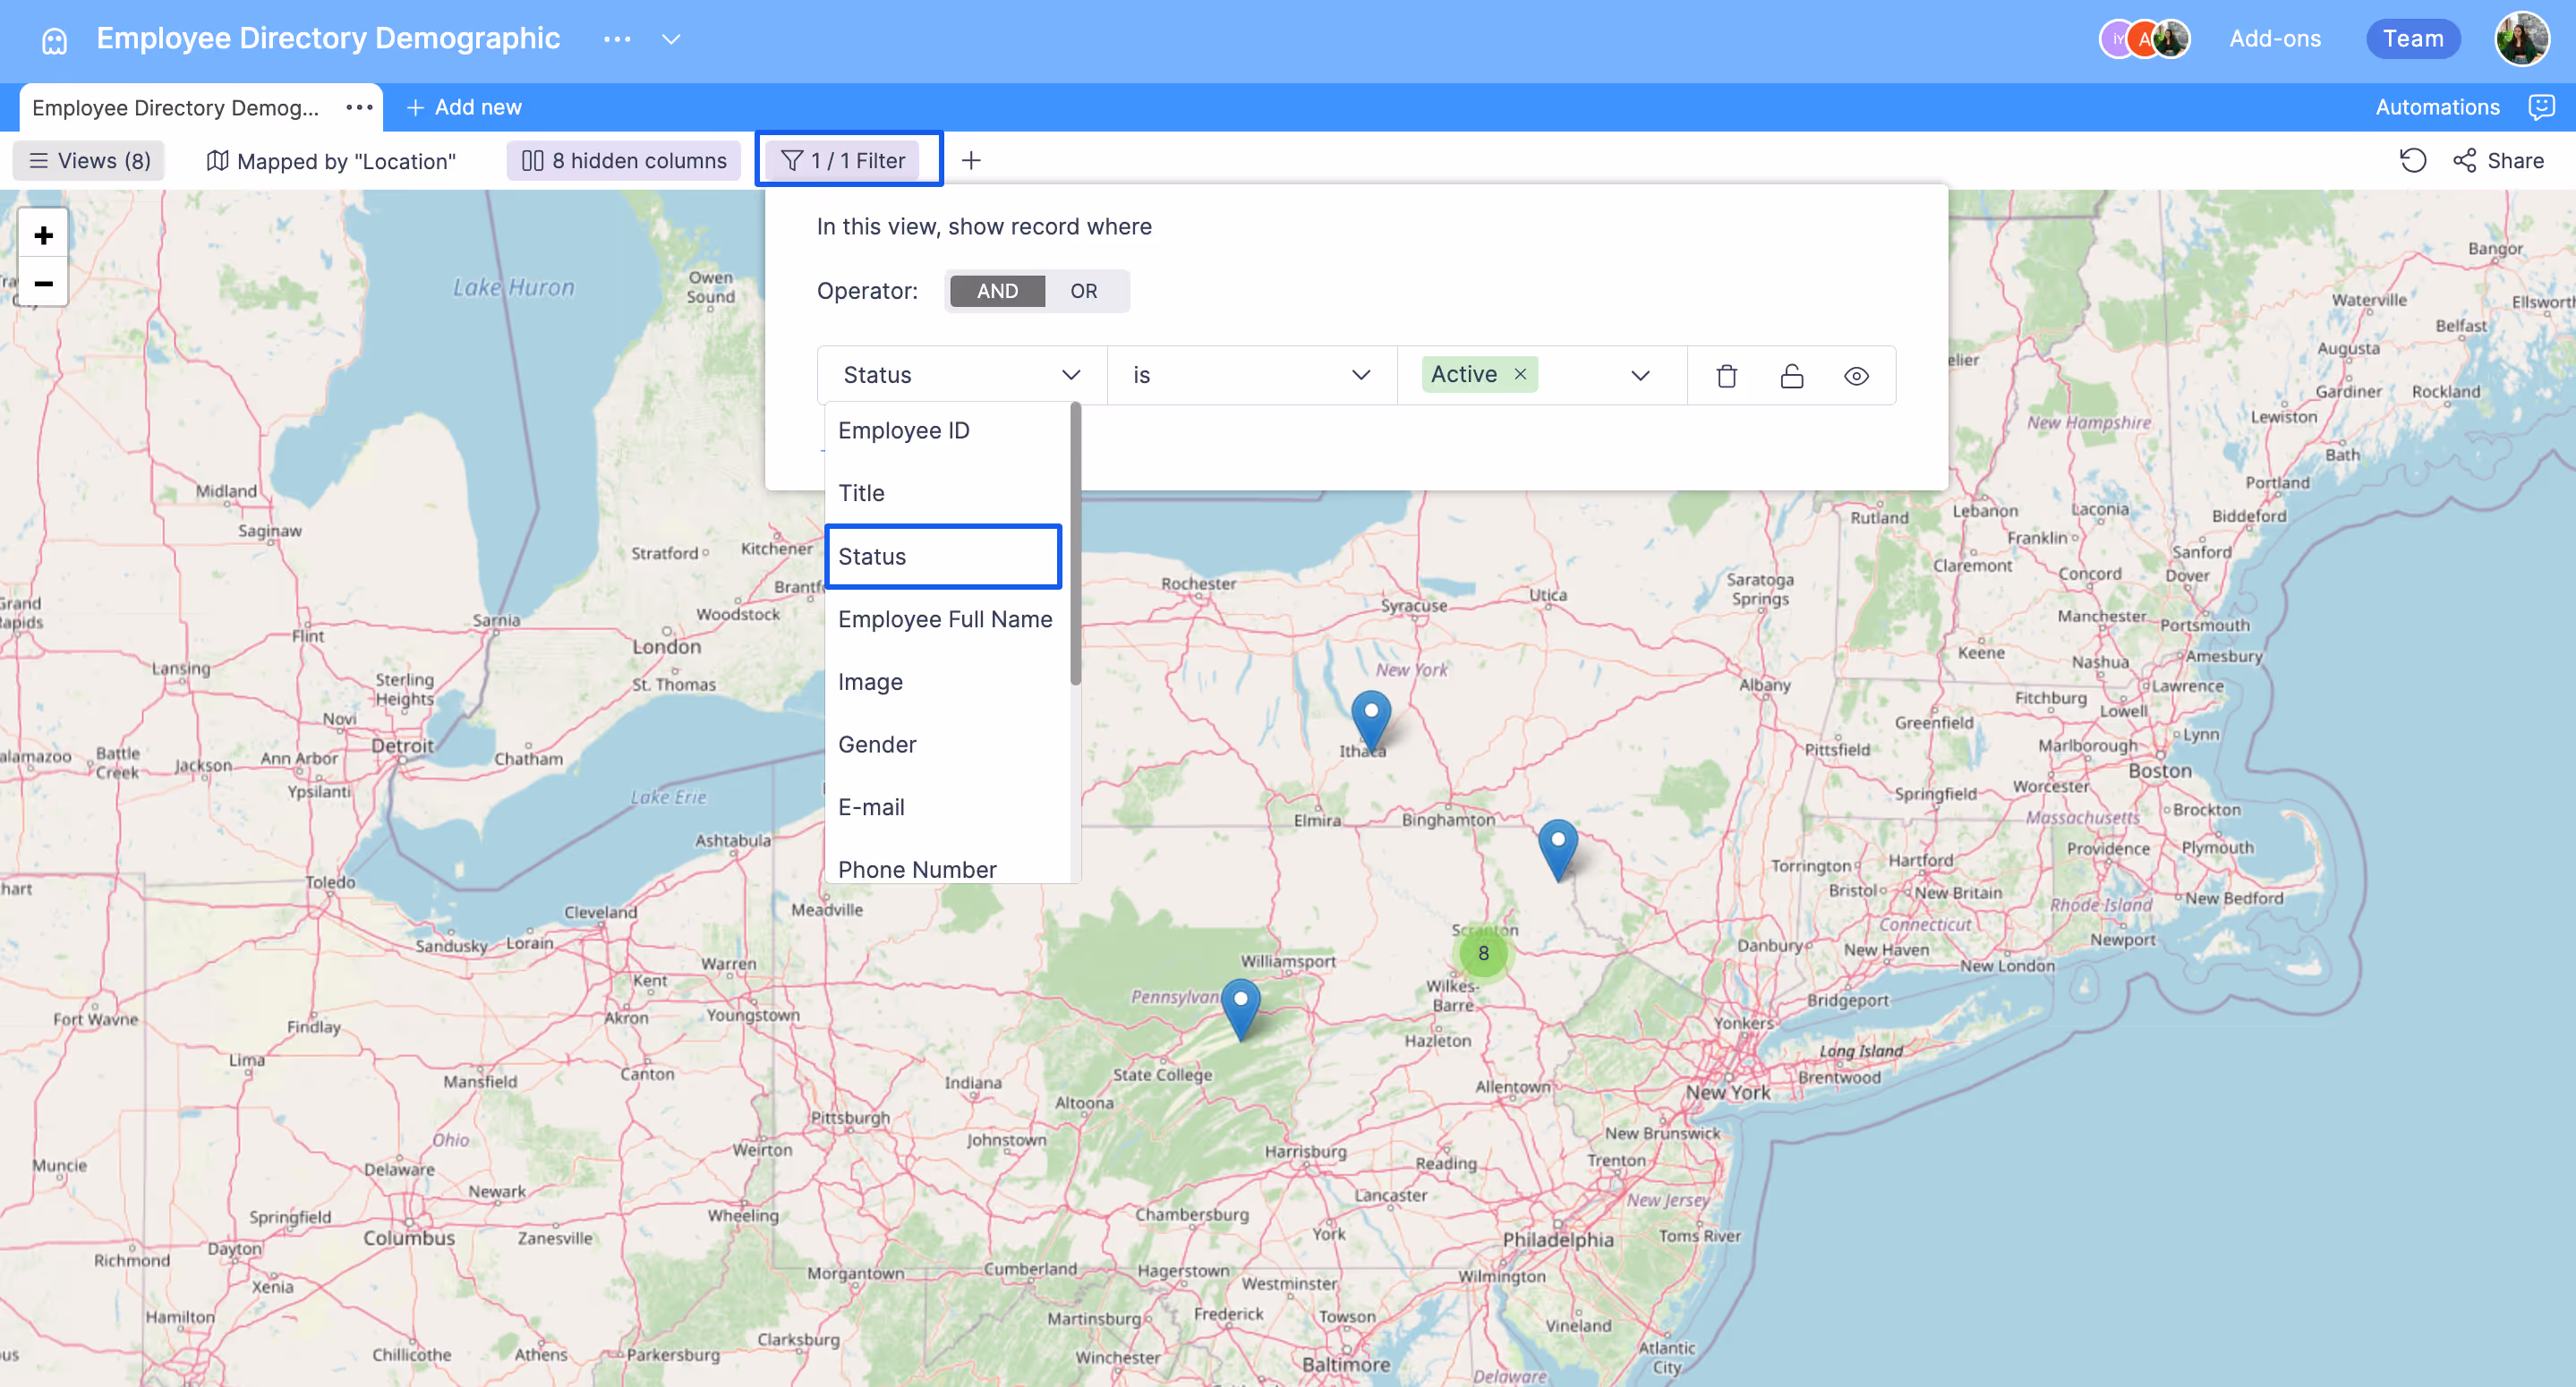
You can apply various filters on your map by clicking the "Filter" button in the toolbar right above your map. With the help of Retable's filtering feature, you can filter the data in your columns according to certain conditions and display only the results that comply with the rules of your filter on the map.
For example, the filter in the image below allows you to view the locations of only people who have "Active" in the Status column.
Column customization
Retable allows you to customize columns for all data views. By clicking the "Columns" button on the toolbar at the top of your map, you can open the panel where you can customize your columns.
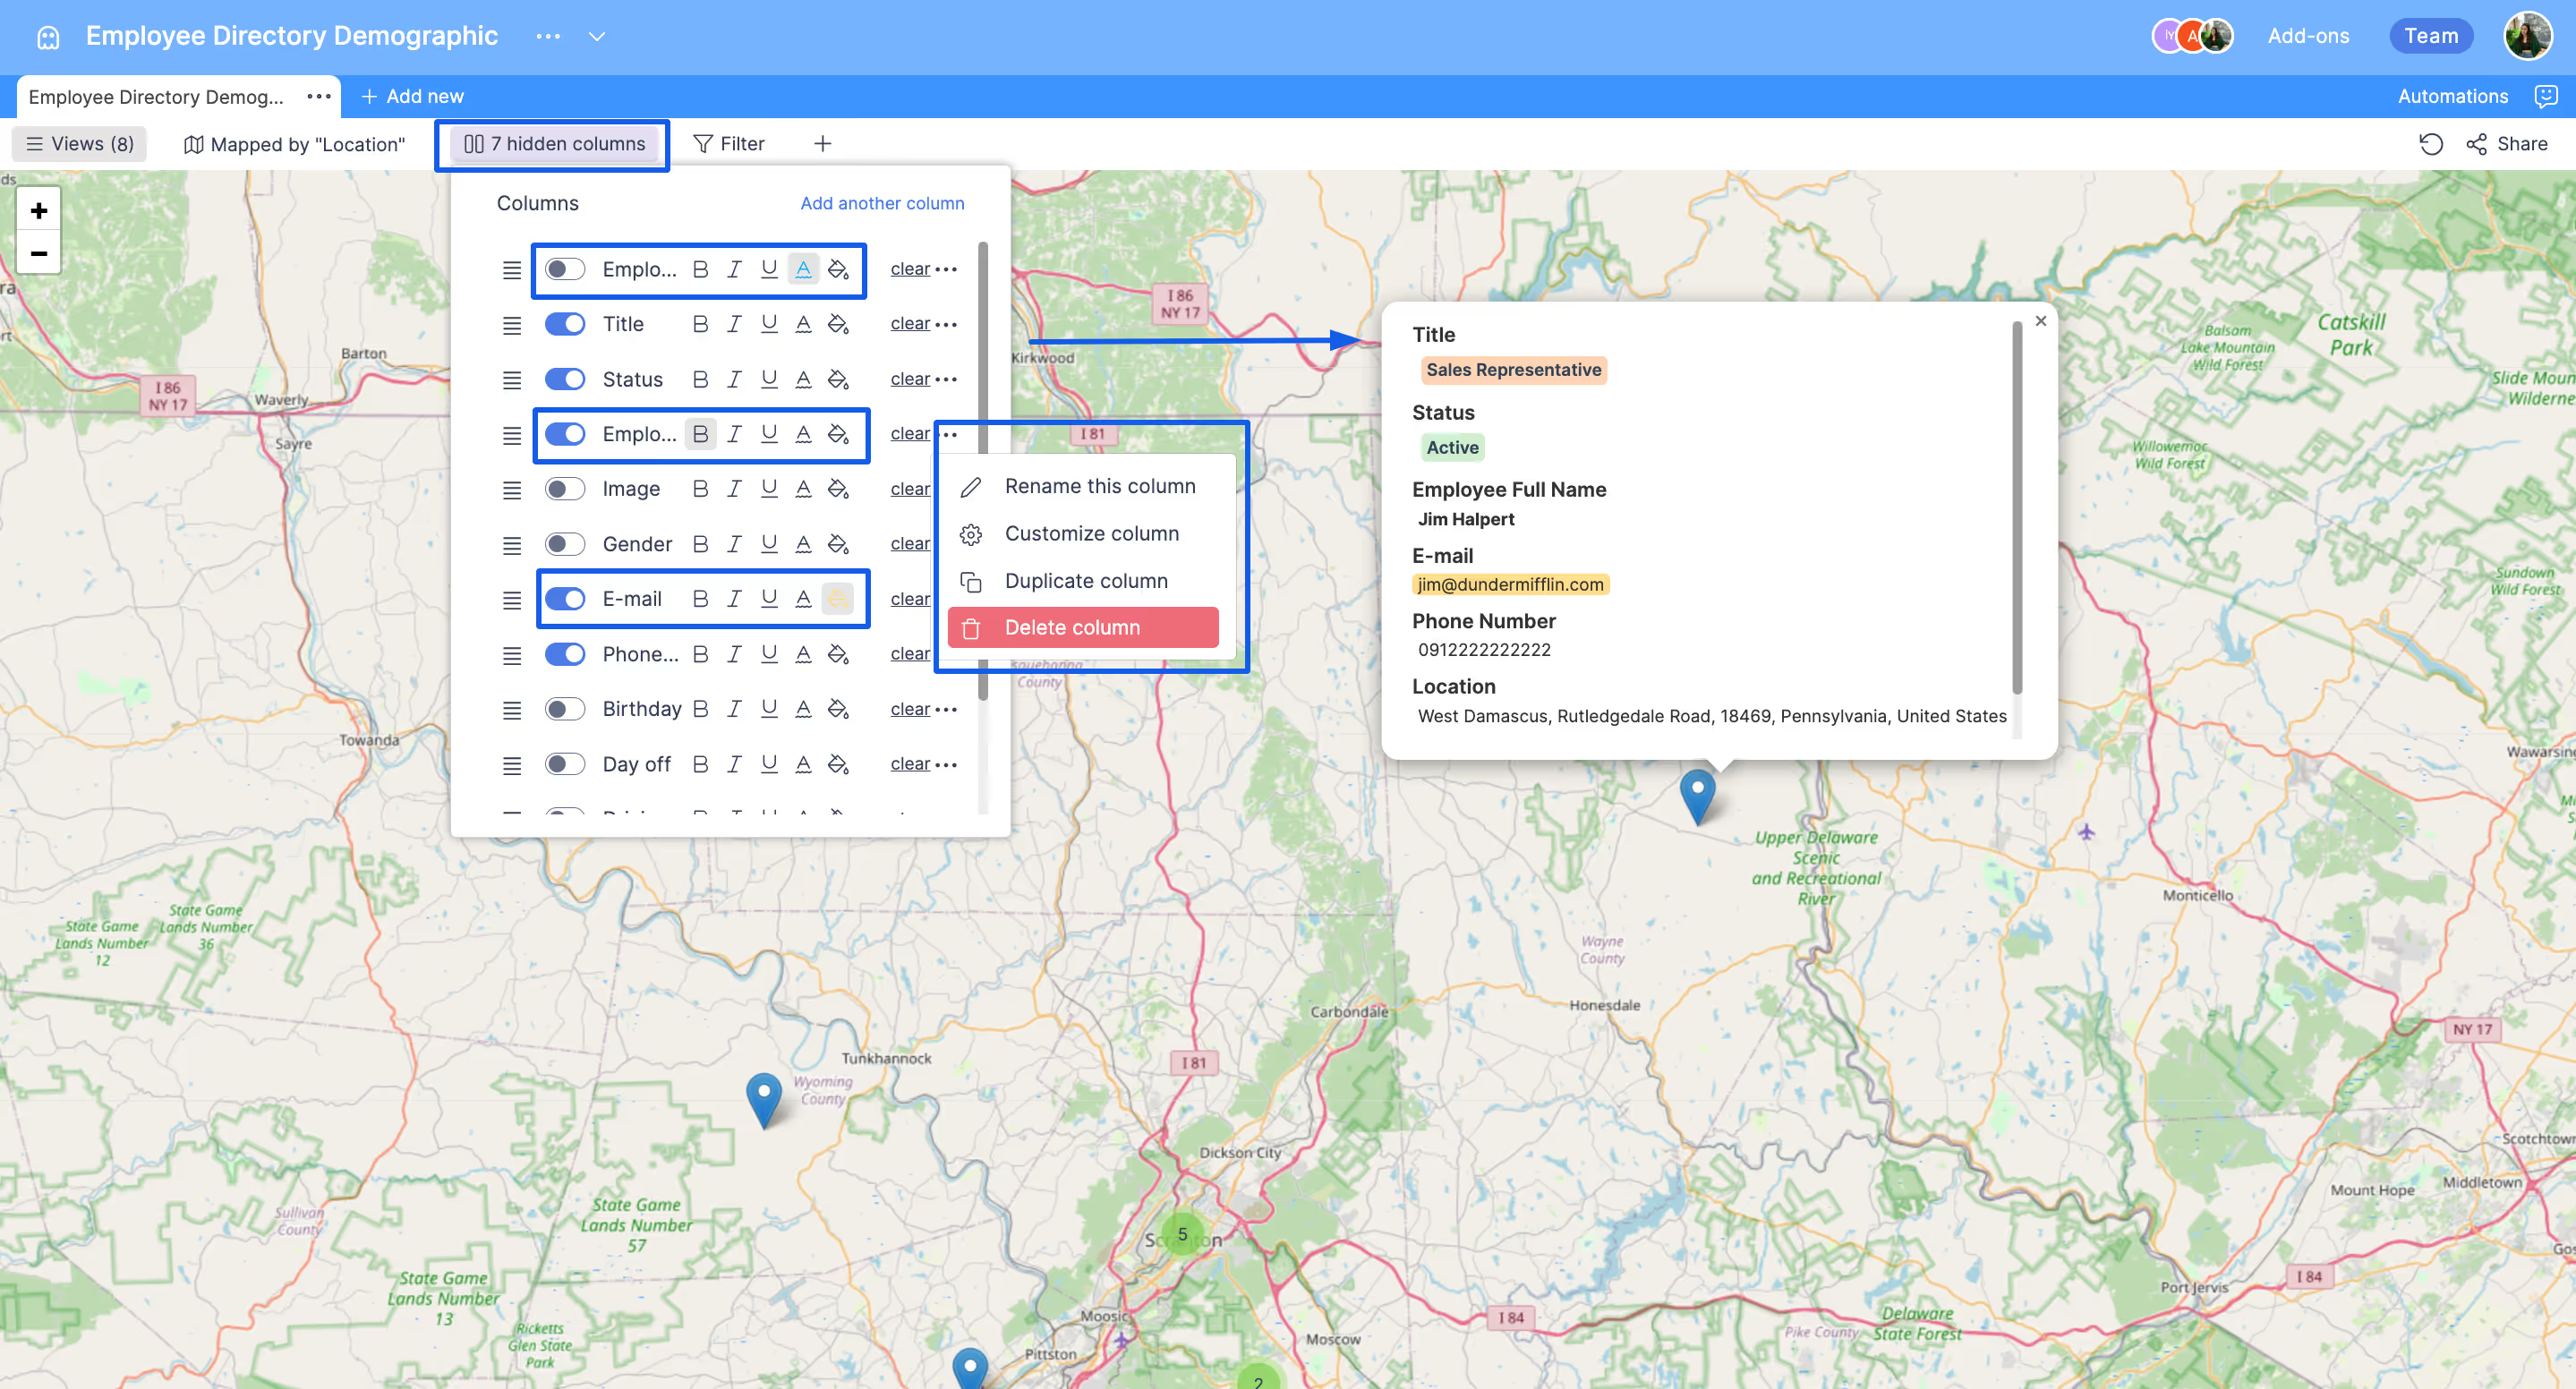
Via this panel you can;
- Hide the columns you do not want to show on your map.
- Change the display order of your columns with drag & drop.
- Format the data in your columns as bold, italic, or underlined.
- Change the text color and background color of the data in your columns.
- Change the name of your columns
- Open the customize column screen of the column you choose.
- Duplicate columns
- Delete columns
How to share your Retable map view
Now that you've completed creating your map, you're ready to share it however you want! Remember that even if you make a change in your map view, the shared map will be synchronized in real time.
To share the public view of your map:
- Click the "Share" button in the right corner of your map.
- Activate the "Create link to view" toggle.
- Copy the link and share.
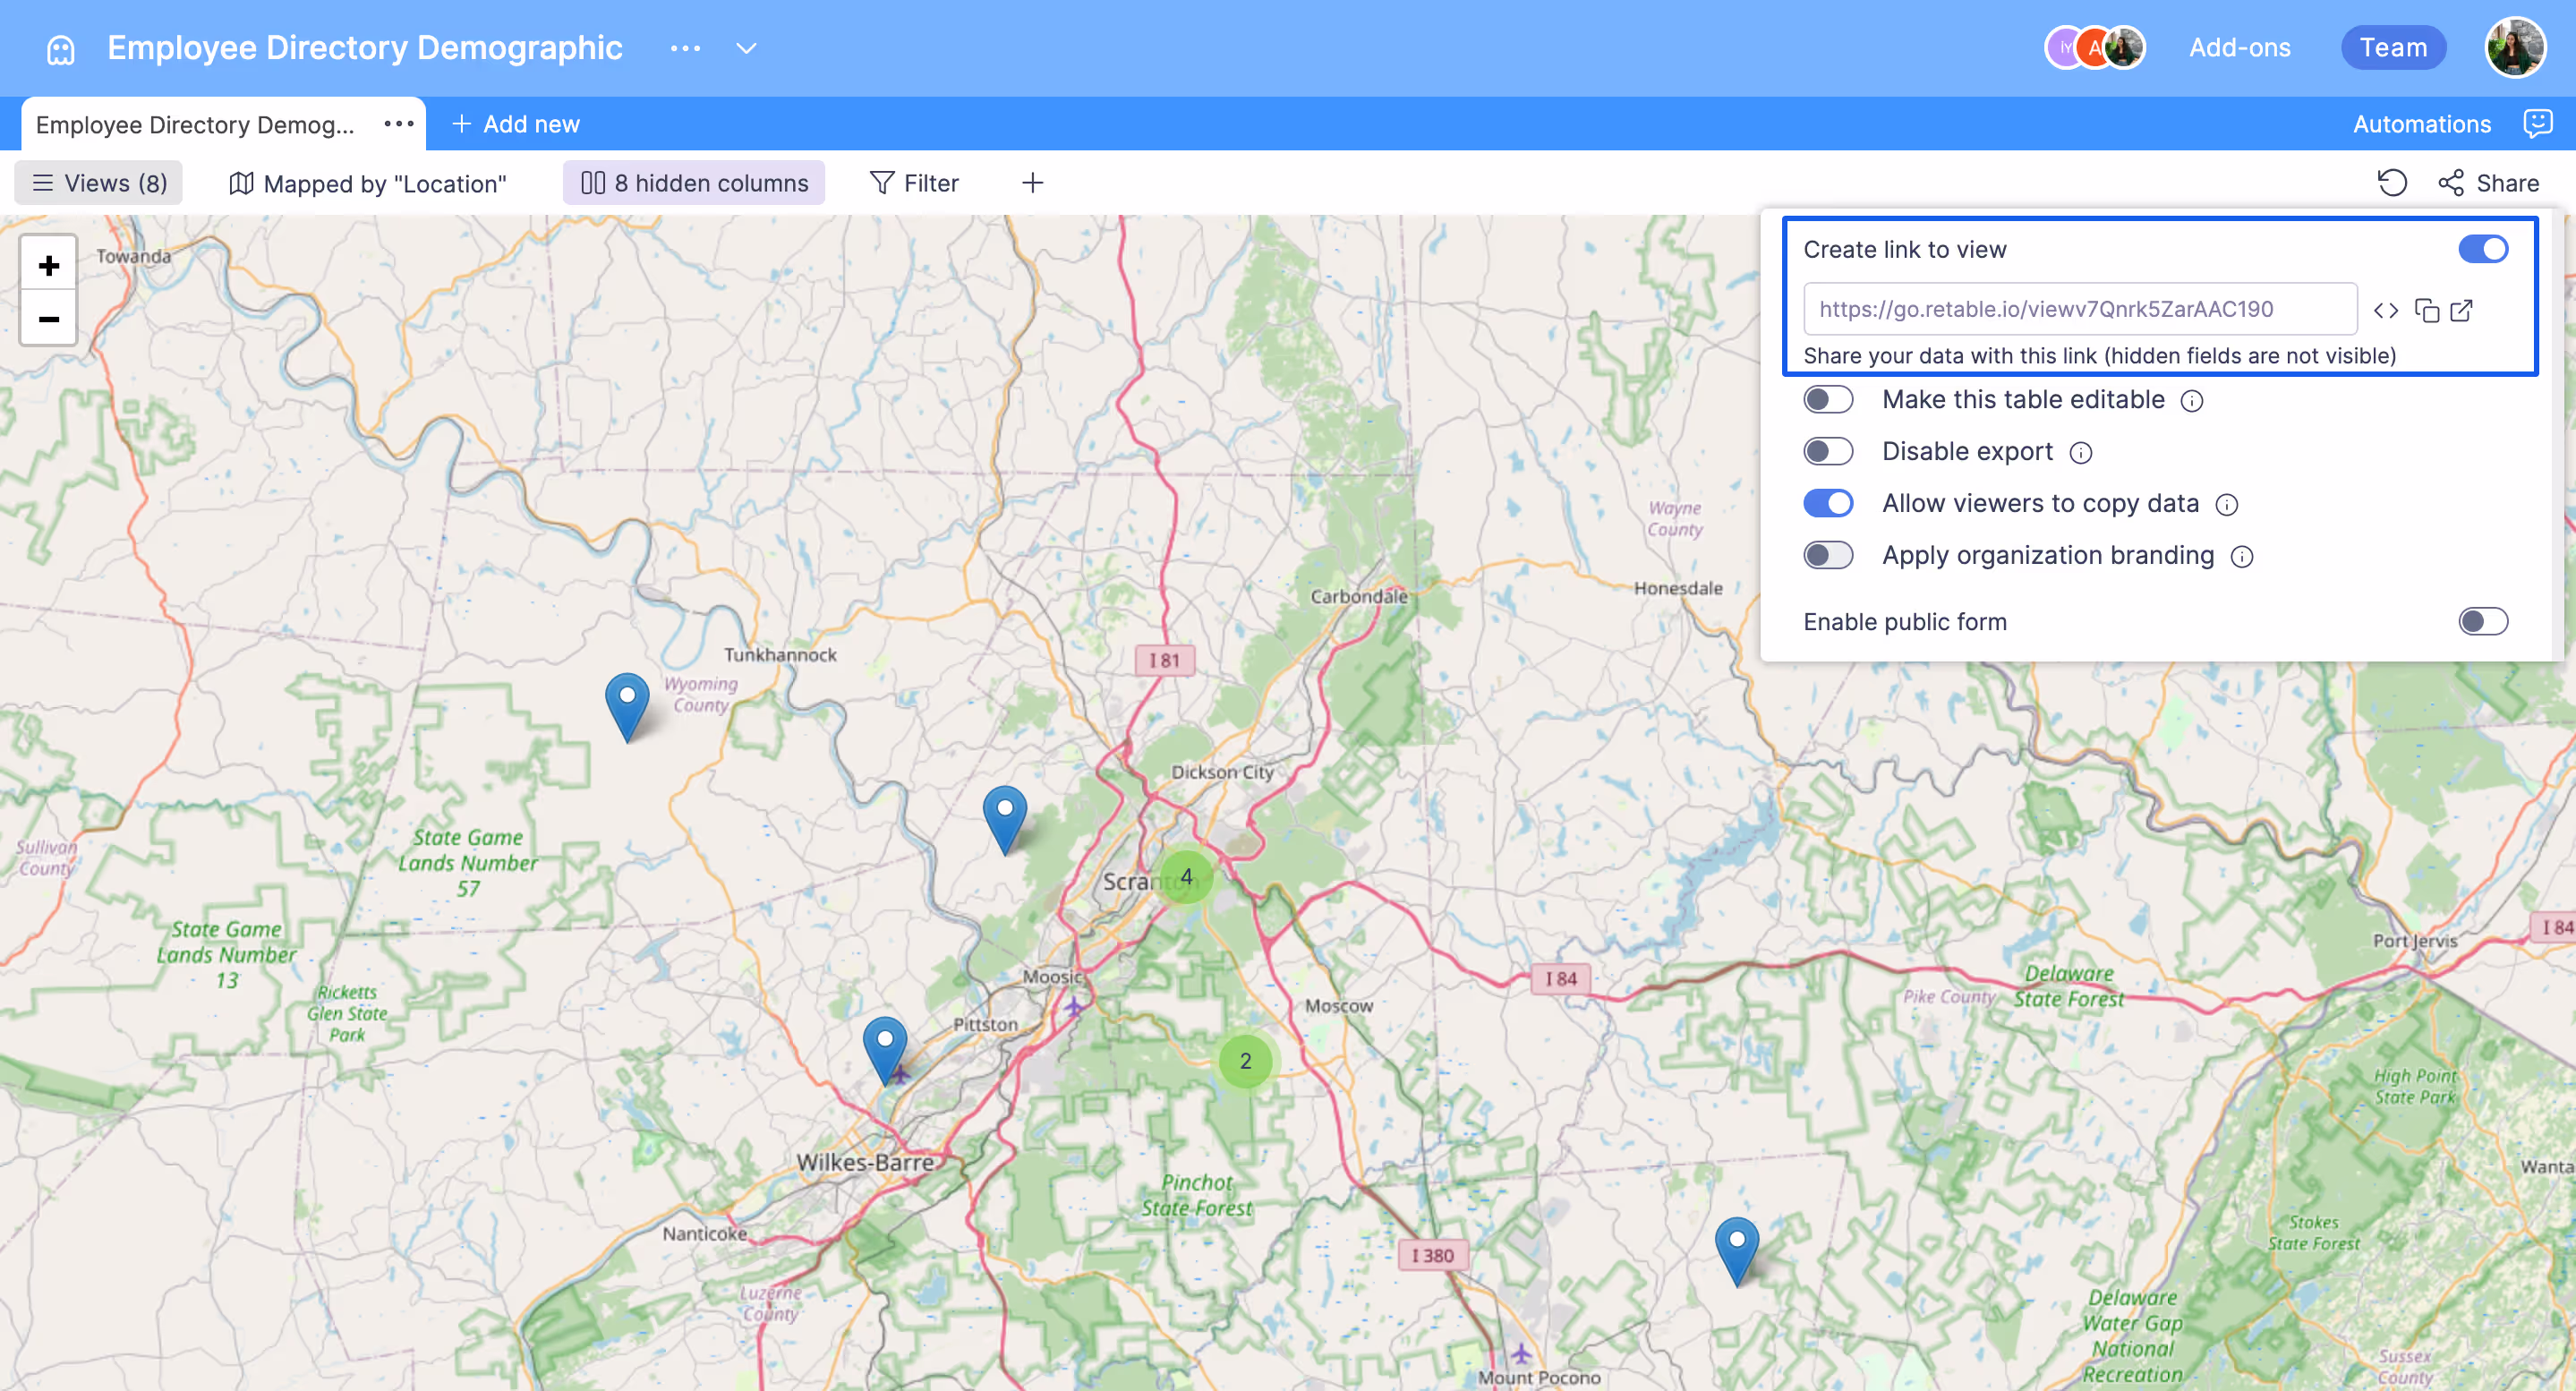
PS:
- When you inactivate the "Create link to view" toggle, the link access will be closed.
- If you activate the "Make this table editable" toggle, your map can be edited by other users logged into Retable. If you do not activate this toggle, the users you share it with will only have the authority to view your map and cannot make any edits.
- If you activate the "Disable export" toggle, the people you share your map with will not be able to export your data.
- If you activate the "Allow viewers to copy data" toggle, people can add a copy of your map to their Retable dashboard. However, this does not cause any changes in your map, it only gives users the opportunity to copy this map.
How to embed your Retable map view
Another way to share your Retable map view is to embed it. You can embed your Retable map views on your website thanks to the iframe code we provide you. This way, people who view your map can interact with it without leaving your website. Remember that even if you make a change in your map view, the embedded map will be synchronized in real time.
To embed your map view:
- Click the "Share" button in the right corner of your map.
- Activate the "Create link to view" toggle.
- Click on the first icon on the right side of your map's link. (This icon is the embedding icon and its tooltip says "Embed the table on your web page".)
- Copy the iframe code in the pop-up window and paste it wherever you want to embed your map on your website.
PS:
- You can change the width and height of the iframe from the "Width" and "Height" fields on the right side of your code.
- You can hide the Retable header right above your map by activating the "Hide Retable logo" toggle.
- Please note that if you inactivate the "Create link to view" toggle from the "share" area, the embedded map will not be accessible.
That is all! Now you know the secret to creating interactive maps with your spreadsheets without the need for complex map tools. Now it's time to create your work of art! By signing up for Retable for free, you can start creating interactive maps with your spreadsheets, and you can speed things up with our ready-to-use spreadsheet templates!
more
Related Resources


Create your smart data management solution
Plan, track, and analyse with your ease. Transform your data with an all-in-one platform, collaborate with your teammates.
Try for free!