.avif)
.avif)
In the modern world, how can you share a message faster and more effectively than just using traditional methods? The answer is screen recording. It allows you to capture everything that's happening on your screen in real-time.
Fortunately, learning how to record your screen doesn’t require any high-level knowledge of software or advanced techniques. It’s a simple process that can be done with just a few clicks.
In this guide, we will walk you through the step-by-step process of how to screen record on both Windows and Mac operating systems. But first, let's take a look at some reasons why you might want to record your screen.
Table of contents
- Why might you need to record a screen?
- How to screen record on a Mac with screenshot
- How to screen record on Windows with Xbox Game Bar
- Third-party tools to capture your screen
- Movavi Screen Recorder
- CleanShot X
- CamStudio
- Conclusion
Why might you need to record a screen?
Actually, there are numerous scenarios where you will use screen recording. We have listed some common cases below:
- Creating video tutorials: If you want to help someone understand a complex process or software, just take a video of your screen while performing the task and share it with them. This way, the viewer can see exactly what you're doing and follow along. It's much more effective than trying to explain something verbally or through written instructions, thus boosting productivity.
- Recording presentations: Whether you're a student or a marketing professional, recording your presentation can serve as a backup in case of technical difficulties during the live presentation or to share it with those who couldn't attend. It can also be useful for later reviewing your performance and making improvements for future presentations.
- Capturing gameplay: Are you an avid gamer or just want to share your gaming skills with friends or YouTube followers? Screen recording your gameplay allows you to do just that. You can also use it to create highlight reels, walkthroughs, and tutorials for specific games or troubleshoot any issues you may be having while playing.
- Saving memories: There may be moments on your screen that you want to remember and cherish forever. It could be a funny conversation with loved ones over video call, a heartwarming message from a friend, or a special achievement in an app. By recording your screen, you can capture and save these memories for future viewing.
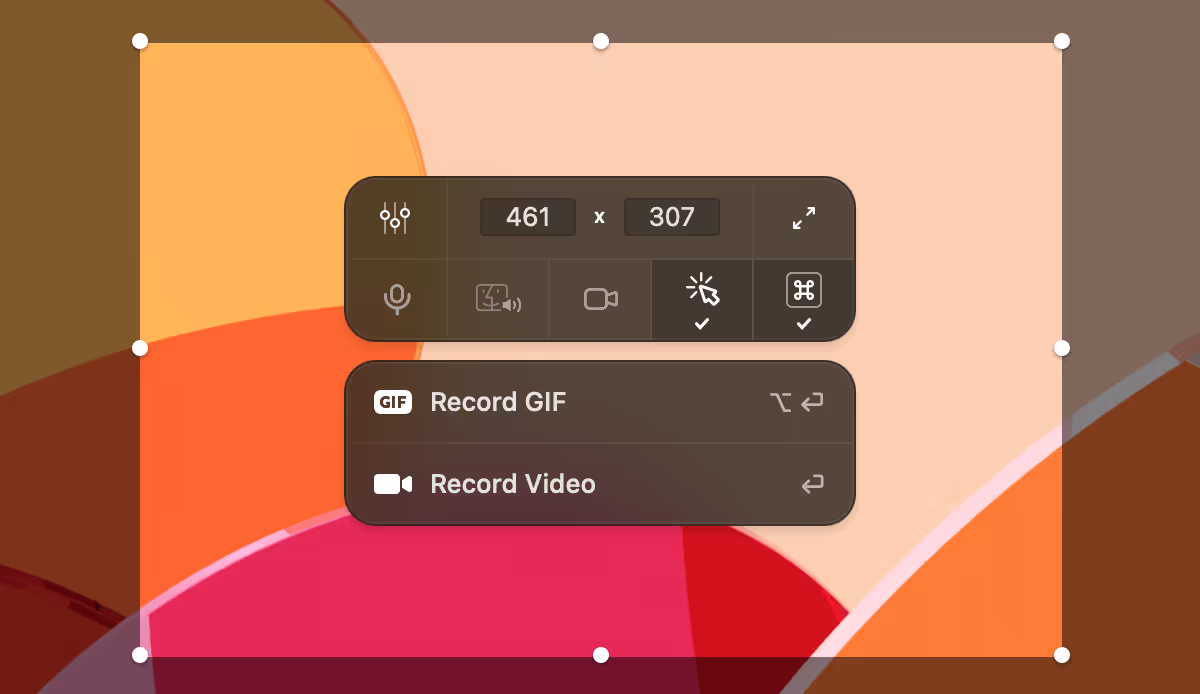
How to screen record on a Mac with screenshot

Mac users have the advantage of a built-in screenshot tool that allows for screen recording. Here's how to screen record on Mac using it:
Step 1: Open the Screenshot Toolbar
Press the standard Mac combination on your keyboard - Command + Shift + 5. A small control panel will appear at the bottom of your screen with options for capturing your entire screen, a selected portion, or a specific window.
Step 2: Choose recording options
Click on the “Options” button in the control panel to select your desired recording settings. You can select where you want to save the recording, set a timer, what audio device to use, show or hide the mouse clicks, and a couple of other options.
Step 3: Start recording
Click on the record button in the control panel or press Command + Shift + R to begin recording your screen. A small menu will appear at the top of your screen indicating that the recording is in progress. You can pause or stop the recording from this menu.
Step 4: Save and edit your recording
To stop the recording, click on the stop button in the menu or press the keyboard command again. Keep in mind that these recordings can be quite large in size. If you're running low on space, clear unnecessary files in the Other storage tab to free up space on your Mac. You can also trim the video and make other simple edits by right-clicking on the recording file in the Finder and selecting “Open With” > “QuickTime Player”.
How to screen record on Windows with Xbox Game Bar
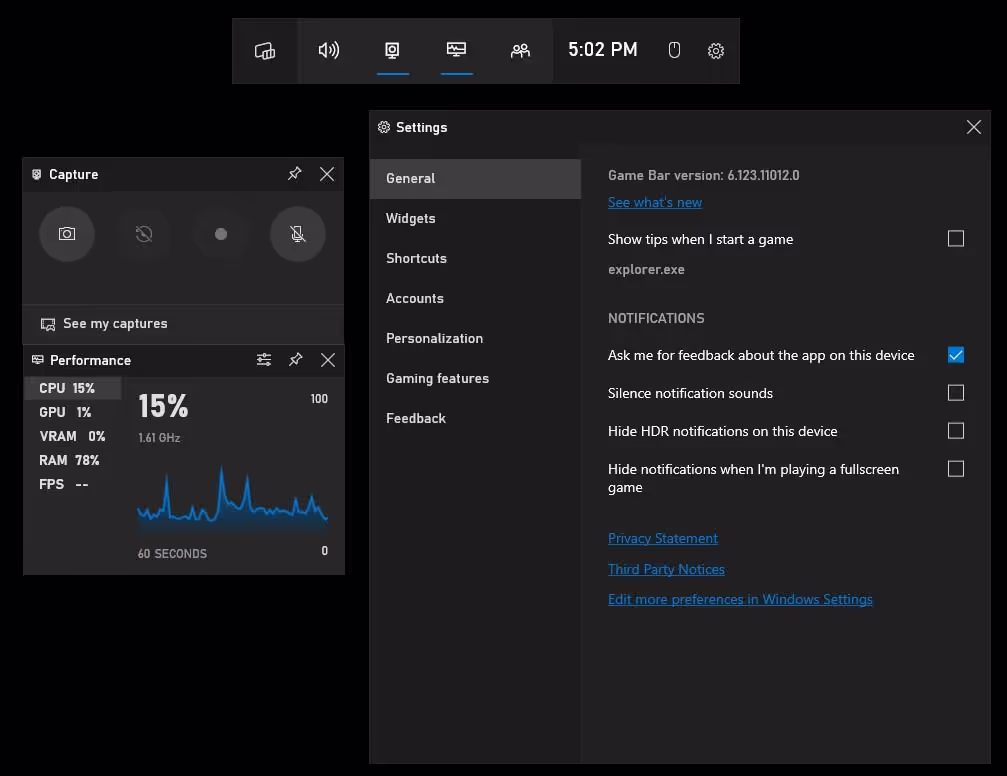
If you want to know how to screen record on Windows 10/11, you are in luck. Microsoft developed the Xbox Game Bar, a built-in tool for recording gameplay and other screen activities. Here are the steps to record your screen with it:
Step 1: Open the Xbox Game Bar
If you use it for the first time, press the Windows logo key + G to open the Game Bar. If it doesn't open, you have to enable it manually. Go to Settings > Gaming and make sure the “Record game clips, screenshots, and broadcast using Game bar” option is turned on. Open the program; if prompted, click “Yes” to confirm your device and follow the instructions.
Step 2: Configure the program
After opening the tool, select the input and output formats and raise or lower the volumes of different sources in the appeared menu. Furthermore, click on the settings icon to tweak the parameters. Enter the shortcut keys, customize the look of the toolbar, and turn on/off different notifications.
Step 3: Begin recording
Once you are ready, click the record button to start your screen recording. Alternatively, you can use the shortcut keys you set up in the settings. You can also use the “Record last” button to record past 30 seconds of activity.
Step 4: Stop and save
To end your recording, click on the stop button on the toolbar or use the assigned shortcut key. The video will automatically be saved to your computer's default “Videos” folder if you haven't changed the location. You can access it by going to File Explorer > Videos > Captures.
Third-party tools to capture your screen
In case you don't want to use the built-in tools, you might wonder how to record your screen. There are other third-party applications available for both Mac and PC that offer more advanced features and customization options. Let's take a look at some options:
Movavi Screen Recorder

Simple toolbar, easy-to-use interface, and various options to choose from — this free screen recorder for Windows and Mac is a good choice to try. It allows capturing screen and system sound at the same time, taking screenshots, scheduling recordings, and editing videos with a basic trimming tool.
Pros:
- Beginner-friendly
- Can record microphone, system audio, and webcam simultaneously
- Additional settings for recording, including FPS, hotkeys, highlighting mouse clicks, removing background noise, etc.
- Annotation tools for adding text, arrows, and shapes in different colors.
Cons:
- Few editing tools
- Watermark in the free trial version
CleanShot X
Although not among the free macOS tools, this one is perfect for advanced options to record, take screenshots, and annotate the screen. Among its features, the app offers a few modes for capturing that disable all notifications and hide desktop clutter to prevent any interruptions and distractions. You can also capture clicks, and keystrokes, add a colored background, and edit the final video.
Pros:
- Record full screen or a specific portion
- Different tools for taking screenshots
- Customizable hotkeys
- Access to cloud storage
- Option to blur or spotlight parts of the screen
Cons:
- Available only for Mac users
- Paid tool with no free version
CamStudio
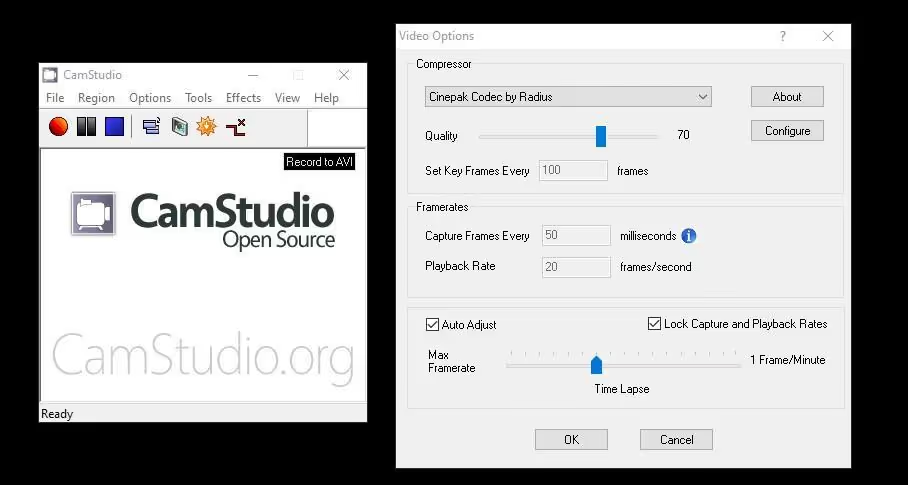
Are you an individual or a startup looking for the best free tools? This free and open-source recording application is a great solution for those who need no extra features than recording their screen. It provides Windows users with several recording modes, including screen and audio capture and webcam-only recording. You can also choose the output quality, add annotations, and save videos in AVI or SWF formats.
Pros:
- Simple to use
- Free with no watermarks
- Different recording modes
- Ability to add captions
- Adjustable settings
Cons:
- Outdated interface
- Limited options
Ready to record your computer screen?
Now that you know how to screen record on Mac and Windows, try out different options and find the one that suits your needs best. Whether you are a gamer, content creator, or someone who wants to save important information from their screen, there is a solution for everyone. Choose the tool that offers the features and simplicity you need for creating high-quality recordings.
more
Related Resources


Create your smart data management solution
Plan, track, and analyse with your ease. Transform your data with an all-in-one platform, collaborate with your teammates.
Try for free!